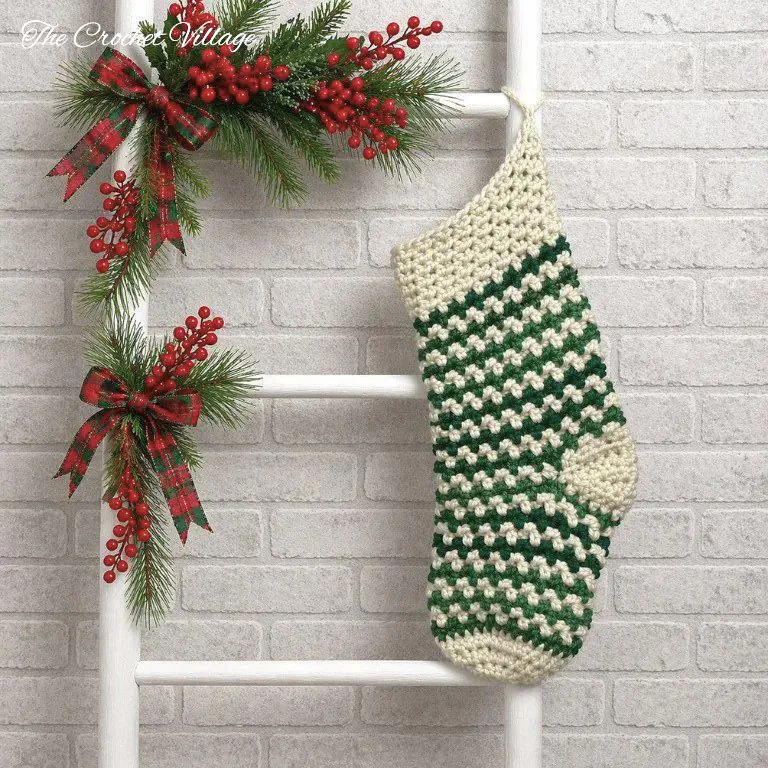
Make this oversized crochet Christmas stocking using bulky yarn and simple stitches! This free crochet pattern is quick, easy, and perfect for adding festive charm to your holiday décor or gifting. The chunky yarn gives it a cozy, textured, handmade feel and works up beautifully fast.
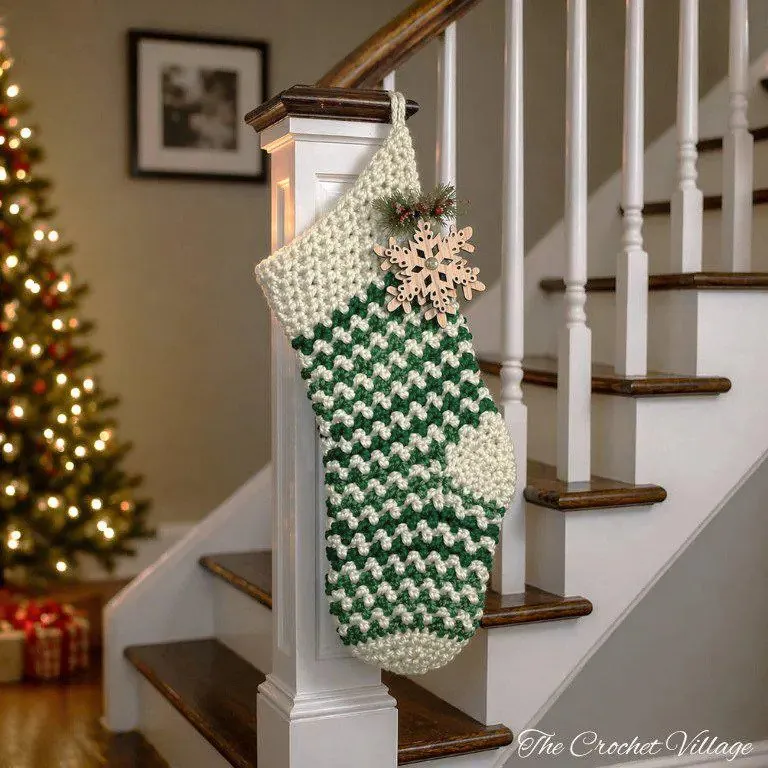
Every year, I find myself making new handmade stockings — it’s truly my favorite holiday tradition. 🎄 I usually start crocheting them in the summer, so there’s no last-minute rush when Christmas arrives. Whether I’m decorating my own home or gifting stockings to friends, neighbors, and family (they’ve come to expect one every year 😄), it’s a project I always look forward to.
This year, I went big! I designed an oversized, chunky Christmas stocking that I absolutely love, and I’m sure you’ll love it too. This free crochet pattern has everything you want in a holiday stocking: it looks gorgeous hanging by the fireplace, it’s large enough to hold plenty of goodies, and the chunky texture gives it that cozy, handmade charm.
Keep reading to find the free pattern, or if you prefer a printable add-free PDF, you can find it on Etsy, Ravelry, and my online store!
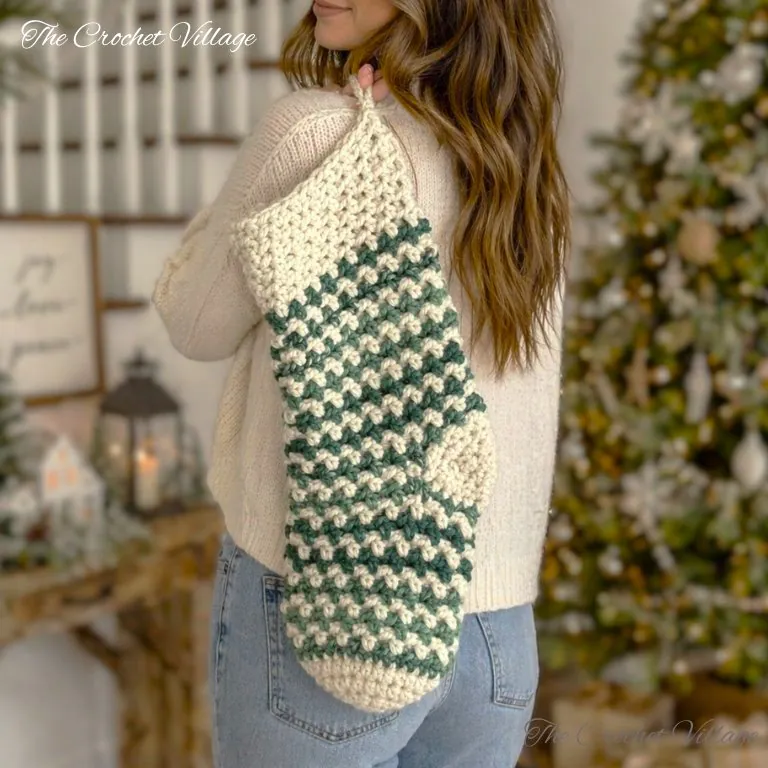
Oversized crochet Christmas stocking pattern
The oversized crochet Christmas stocking pattern is written for intermediate crocheters, but it’s simple enough if you’re comfortable with the basics. It’s worked in one piece from the toe up using just half double crochet stitches and half double crochet in the back loop — easy, rhythmic, and satisfying!
I used bulky yarn, but you can easily double up your favorite #4 worsted-weight yarn for a similar chunky result. Since you’ll be working with thick, cozy yarn, this crochet Christmas stocking works up very quickly — perfect if you’ve got a long gift list this year! You can whip up several in no time and mix and match colors to create fun, coordinated sets for the whole family.
If you’re ready to start your Christmas crochet projects, this free chunky stocking crochet pattern is a perfect place to begin.
Large Crochet Stocking Pattern: Start Here
Recommended Yarn: 🧶# 5 Bulky weight yarn ( you can double a #4 medium weight yarn). I used,
- Yarn A: Lion Brand Hometown Yarn, color shown: Dillon Quarts
- Yarn B: Yarn Bee Dream Spun, color shown: Meadow Dream.
Note: The suggested yarns are slightly different in thickness, but they worked great for the design.
Yardage:
- Yarn A: About 120 yds.
- Yarn B: About 76 yds
Yarn Substitution
Crochet hook: 9 mm
Other Materials
- Faux leather tags
- Tapestry needle: to weave in ends.
Abbreviations
- CH: Chain
- ST: Stitch
- SL ST: Slip stitch
- HDC: Half double crochet
- BLO: Back loop only
- HDC2tog: Half double crochet two together
- INC: Increase
- YO: Yarn over
- MS: Marked stitch
- SM: Stitch marker
- Rnd: Round
- Rep: Repeat
Gauge: 4”x 4”= 10 HDC and 8 Rows
Finished measurements: 19” in length x 8” in width

Pattern Notes
- This pattern is written in US terms.
- Skill level: Intermediate.
- This stocking is crocheted from the toe up, and it’s made of 4 connected parts: the toe, the foot, the heel, and the cuff.
- All parts of the stocking are crocheted in continuous rounds except the heel, it is crocheted in rows.
- When you crochet the heel, you should turn your work at the end of the rows.
Special Stitches
- HDC2tog: Yarn over, insert your hook into the stitch, and pull up a loop; insert your hook into the next stitch, and pull up a loop. You now have 4 loops on your hook. Yarn over and pull through all 4 loops.
- Half double crochet increase (INC): Place two HDCs in the same stitch.
Wintergreen Crochet Christmas Stocking Pattern
This free crochet Christmas stocking pattern has everything you need to make your own Wintergreen stocking. In this post, you’ll find the complete materials list and detailed step-by-step instructions to guide you through every stitch.
If you’d prefer a printable, ad-free PDF, you can grab a copy for a small fee in any of my shops—links are below.
Prefer A Printable PDF?
Treat yourself to the ad-free, beautifully formatted version of this design for a small fee!
Step 1- Crochet the toe
With yarn A, make a magic circle, CH1.
Rnd 1: 8 HDC in the circle, join with a SL ST into the 1st HDC, CH1. (8)
Rnd 2: 2 HDC in each ST around, join with a SL ST into the 1st HDC, CH1. (16)
Rnd 3: *2 HDC in next ST, HDC in next ST*, rep *to* around, join with a SL ST into the 1st HDC, CH1. (24)
Rnd 4: *2 HDC in next ST, HDC in next 2 ST*, rep *to* around, join with a SL ST into the 1st HDC, CH1. (32)
Close the magic circle: Pull tight and tie off the yarn to close and secure it with a couple of knots.
Step 2- Crochet the foot
Rnd 5: With yarn B, HDC in each ST around, join with a SL ST into the 1st HDC, CH1 with yarn A, drop yarn B. (32)
Rnd 6: With yarn A,*HDC in next ST, HDC BLO in next ST,* rep *to* around, join with a SL ST into the 1st HDC, CH1, with yarn B, drop yarn A. (32)
Rnd 7-15: Rep Rnd 6, changing colors at the end of each round. At the end of Rnd 15, Place SM in the last ST, join with a SL ST, change to color A, and crochet the heel next.
Step 3 – Crochet the heel
To crochet the heel, you switch from working in rounds to working in rows. After finishing the heel, fold it in half towards the inside of the stocking. Attach one corner, crochet to the other corner, and attach it. Then, resume working in rounds. The sides of the heel will remain open until you close them at the end.
Row 1: HDC in same ST as the SL ST, HDC in each of the next 13 ST, place a SM in the last ST, CH 1, turn. (14)
Row 2: HDC2tog, HDC in each of next 10 ST, HDC2tog, CH 1, turn. (12 HDC)
Row 3: HDC2tog, HDC in each of next 8 ST, HDC2tog, CH 1, turn. (10 HDC)
Row 4: HDC2tog, HDC in each of next 6 ST, HDC2tog, CH 1, turn. (8 HDC)
Row 5: HDC INC in 1st ST, HDC in each of the next 6 ST, HDC INC in last ST, CH 1, turn. (10 HDC)
Row 6: HDC INC in 1st ST, HDC in each of the next 8 ST, HDC INC in last ST, CH 1, turn. (12 HDC)
Row 7: HDC INC in 1st ST, HDC in each of the next 10 ST, HDC INC in last ST, CH 1, turn. (14 HDC)
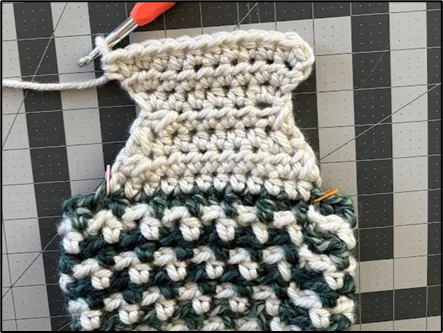
1- Fold the heel in half, toward the inside of the stocking, SL ST into the base of the heel (in the MS), HDC in same ST, * HDC in next ST, HDC BLO in next ST, * rep *to* around until you reach next MS (19 ST)
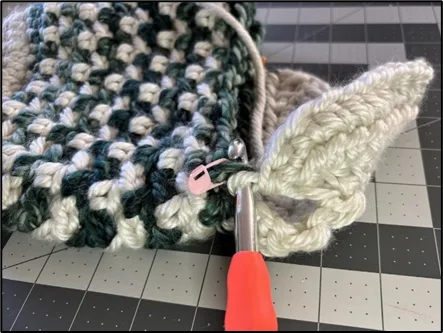
2- Attach the other end of the heel with a SL ST in the MS and the corner of the heel, CH1 with yarn B (this will be the new starting point), *HDC in next ST, HDC BLO in next ST, * rep *to* until you reach the other end of the heel, HDC in the SL ST, * HDC BLO in next ST, HDC in next ST,* rep *to* around, join with a SL ST into the 1st HDC, CH1 with yarn A.
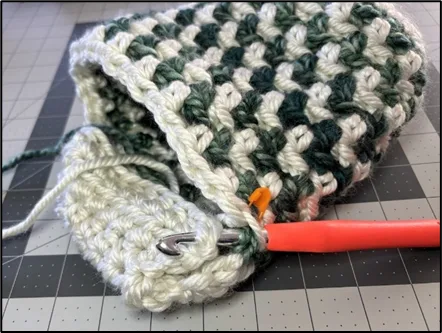
3- From now on, you will crochet in rounds. Make sure you have 34 HDC and you are alternating between HDC and HDC BLO. The sides of the heel stay open until the final step. Crochet the cuff next.
Step 4 – Crochet the Cuff
Rnd 18: With yarn A,*HDC in next ST, HDC BLO in next ST,* rep *to* around, join with a SL ST into the 1st HDC, CH1, with yarn B, drop yarn A. (34)
Rnd 19-29: Rep Rnd 18, changing colors at the end of each round. At the end of Rnd 29. Cut yarn B, and continue with yarn A.
Rnd 30- 36: With yarn A, rep Rnd 18. At the end of the last row, fasten off.
Step 5 – Finish the stocking
Crochet the Hanger loop: With the yarn, slip knot, SL ST in the top corner on the heel side, CH 10, SL ST in the same ST as the 1st SL ST to form a loop, CH 1, fasten off.
Close the sides of the heels: Turn the stocking inside out. Use a tapestry needle and yarn to sew the sides of the heel. If there are any noticeable holes in the corners of the heel, sew those up as well.
Weave in all ends, and you are all done!
I offer full support to help you with any questions or challenges you might have. Feel free to drop your comments in the section below or join our Facebook group, where I, along with my wonderful testers and community members, will be more than happy to assist you!