
When you follow a crochet pattern exactly—same yarn, same hook, same stitches—but still end up with a project that’s too big or too small, you’re often told, “You should have checked your gauge before starting.” But what does that actually mean? And why does it matter so much?
If you’ve been skipping gauge swatching or feeling confused by it, you’re not alone! In this blog, I’ll break down everything you need to know—what a crochet gauge swatch is, how to measure it correctly, and what to do if your gauge doesn’t match the pattern—so your next project turns out just right. Let’s get started!
Related: Crochet Tutorials
What Is a Crochet Gauge Swatch?
A gauge swatch is just a small sample of the pattern—usually a 4″ square—made with the yarn and hook size recommended in the pattern. The goal is to compare it to the pattern’s gauge and see if any adjustments are needed. Ideally, your swatch should match the pattern’s stitch and row count.
For example, if a pattern says “4” x 4” = 13 DC and 18 rows,” it means the designer’s swatch, using the specified yarn and hook size, had 13 double crochet stitches across and 18 rows within a 4” square.
Here’s why it matters: let’s say your 4″ swatch has more stitches than the pattern’s gauge. In a large project, those extra stitches will add up, making your project larger than intended.
If your swatch matches—same number of stitches and rows—awesome! You’re all set. If not, you need to adjust your hook size until your swatch matches the pattern’s gauge.
You don’t need to swatch for small, simple projects like scarves or washcloths, as long as you’re using the same yarn weight and hook size suggested by the pattern. But for bigger projects like blankets, fitted garments, or hats, it’s a good idea to check your gauge to avoid any surprises later on!

Crochet your swatch
- Check the pattern’s gauge information first. A crochet pattern usually includes gauge information, which might look like “4” x 4” = X sts and Y rows” or sometimes just “4” = X sts x Y rows.” This means that the designer has X stitches and Y rows in a 4″ square, and that’s what you’ll try to match.
- Read through the designer’s notes to see what hook size they used. Sometimes, a pattern calls for more than one hook size, but usually, only one is used for the swatch.
- Also, check the stitch recommended (often single crochet or double crochet, but sometimes a specific stitch pattern is mentioned for better accuracy).
- Some patterns even require the swatch to be made in the round, so be sure to pay attention to those details.
- If the pattern mentions that the gauge was measured after blocking, block the swatch first before checking measurements.
Use the recommended yarn and hook, and crochet a swatch that’s slightly larger than 4 inches square. This will give you a more accurate reading when measuring, as the stitches on the edges and foundation chain are often crocheted more tightly.
For example, if a pattern states “4” x 4” = 13 DC and 18 rows with a 5 mm hook,” crochet a swatch that is at least 4” x 4” by making a foundation chain slightly longer than 13 stitches and working at least 18 rows using a 5 mm hook.
Check your gauge
- Once your swatch is ready, block it if recommended by the pattern.
- Use a measuring tape, ruler, or gauge checker tool to count how many stitches and rows fit into a 4-inch square.
- Place the tool in the center of your swatch.

- If you’re using a measuring tape, place it horizontally in the middle of the swatch to count the stitches. Then, place it vertically to count the rows.

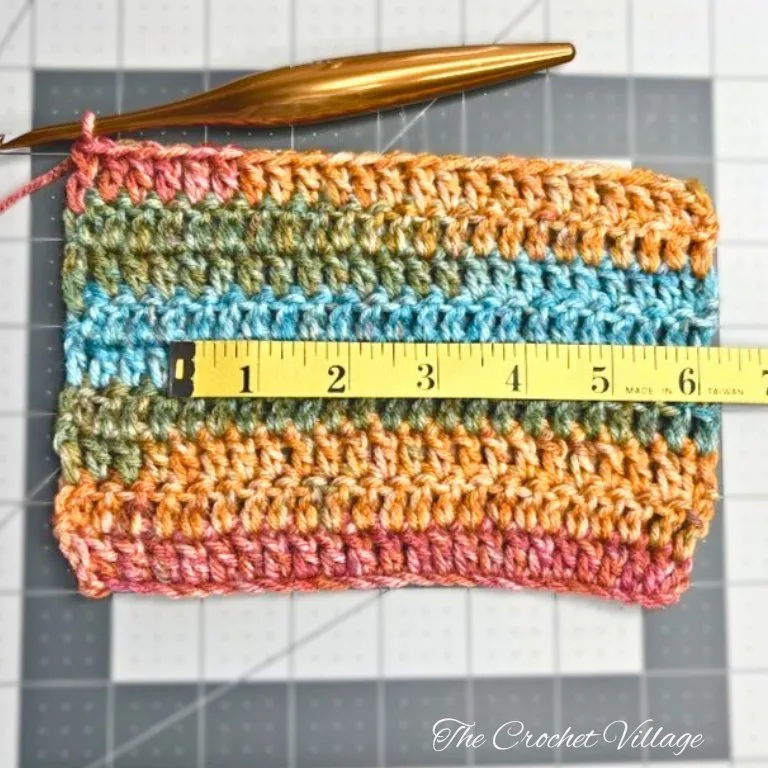
- Be as accurate as possible, and don’t ignore half stitches—they add up and can make a big difference!
- Carefully count the stitches and rows within the 4-inch square to see if they match the pattern’s gauge.
If the Gauge Uses Other Stitches Than SC and DC
Sometimes, the gauge will use stitches other than single crochet (SC) or double crochet (DC), or a mix of both. The pattern will tell you exactly which stitches to use for the gauge, so be sure to make your swatch using the exact stitch listed in the gauge. Once you’ve completed it, count all the stitches—whether they’re SC, DC, or something else—within the 4″ square.
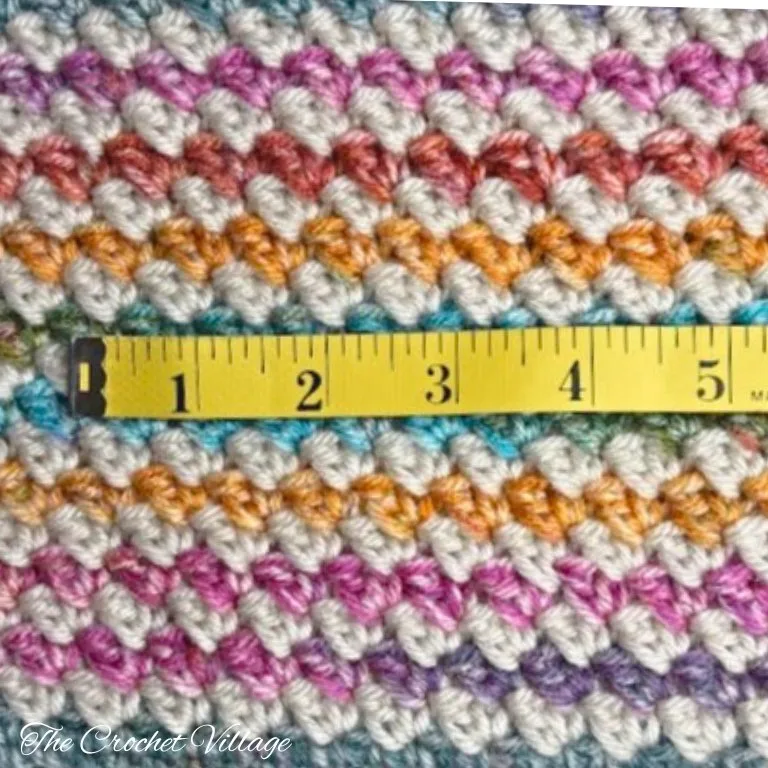
Example: If the gauge says 4″ square = 14 st (pattern’s stitch), this means that within the 4″ square, you should have 14 stitches following the pattern’s stitch. Count all the stitches and rows within the 4″ square, as shown in the photo below.
If the Gauge Uses More Than One Crochet Hook
If the pattern requires more than one crochet hook, the hook used for the swatch will be specified. You should use that exact hook size to make your swatch.
For example, if a hat is crocheted with a 6mm hook and the ribbing is worked with a 5mm hook, the gauge might be given like this: “4” x 4″ using a 6mm hook = 15 sc and 18 rows.” This means that when using the 6mm hook, your swatch should have 15 single crochet stitches and 18 rows in a 4″ square.
Sometimes, the pattern will recommend making two swatches—one for the ribbing with the 5mm hook and another for the body of the hat with the 6mm hook, for example. The pattern will specify this, so make sure to follow the instructions and create both swatches to ensure the project fits as intended.
What If Your Gauge Doesn’t Match?
The purpose of gauge swatching is to compare your tension with the designer’s and make any necessary adjustments to match it. Here’s what you can do if your stitch count or row count is off:
- If your swatch has more stitches in 4″ than the pattern’s gauge, it means your stitches are too tight. To fix this, try switching to a larger hook size to loosen up your tension. Make another swatch with the new hook size, and compare it to the pattern’s gauge again. It might take a few tries, but keep adjusting until your swatch matches—or gets as close as possible—to the correct gauge. Once it’s right, you’re good to go!
- If you have fewer stitches per 4 inches than the pattern’s gauge, it means your stitches are too loose. To fix this, try switching to a smaller hook size to tighten up your tension. Make another swatch with the new hook size and compare it to the pattern’s gauge. Keep adjusting until your swatch matches, or is very close to, the correct gauge.
- If your stitch count matches but your row count is off, it might be due to how you form your stitches. If you have too many rows, try making your loops a bit bigger. If you have too few rows, try tightening them slightly. Another factor could be that your yarn is thicker or thinner than the one used in the pattern. If the pattern allows, you can adjust the row count or switch to a different yarn to achieve the correct length.
Final Thoughts
I know, gauge swatching might seem like an extra step, but it’s worth it! Taking a little time to check your gauge now can save you a lot of frustration later. It ensures that all your hard work results in a project that fits just right. So next time you’re about to start a sweater, blanket, or any crochet project, don’t skip the swatch—it’s the secret to a perfect finish!
Explore our crochet garment patterns, with some available for free to try out! Perfect for testing your gauge swatching, these patterns help ensure the right fit while letting you practice with different stitches and techniques.
I hope this guide helped you understand how to swatch and adjust your gauge. Happy crocheting!



Thank you for this post. Helps a lot. 🥰
Hi Lisa!
You’re so welcome — I’m so glad to hear that! 🥰