Looking for quick last-minute gifts? This free crochet wine bottle bag pattern is perfect! Simple, elegant, and beginner-friendly – it works up in just 2 hours.

I’m so excited to share this free crochet wine bottle bag pattern with you — the Merry Berry Wine Bottle Carrier!
If you’re looking for quick and easy last-minute gifts for Christmas or any other occasion, you can never go wrong with a nice bottle of wine. Simply use your crochet skills to dress it up a bit and add that handmade touch that makes it extra special.
Over the years, I’ve created a whole collection of crochet wine bottle holders — each one a little different — all made when I needed a gift in a hurry! You can check them out here!
The Merry Berry Wine Bottle Carrier is simple, elegant, and full of handmade charm. For this project, I used #4 worsted-weight cotton yarn, and I absolutely love how it turned out.
Keep reading to find the free pattern, or if you prefer a printable add-free PDF, you can find it on Etsy, Ravelry, and my online store!
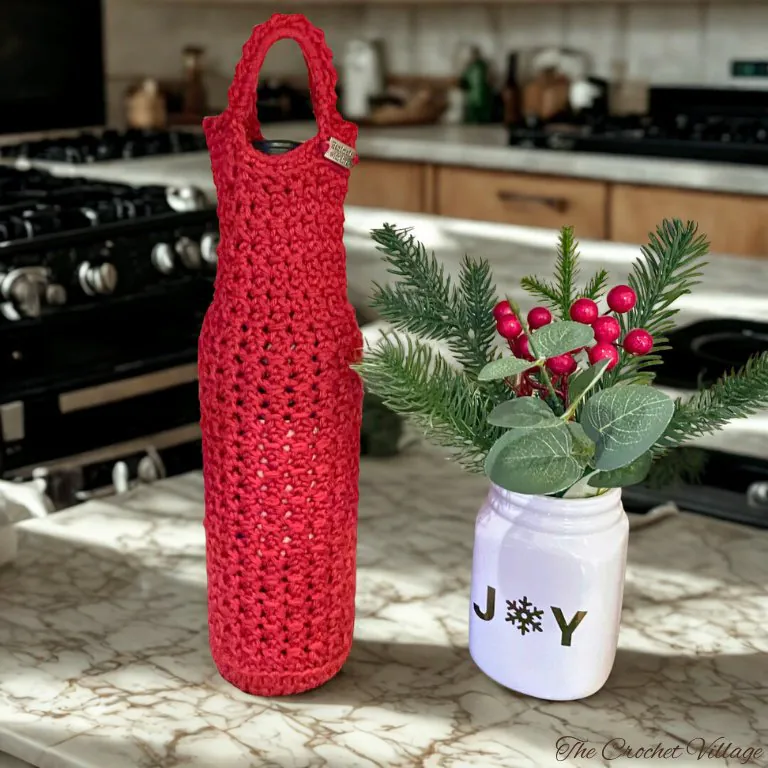
Cotton yarn gives the wine bottle holder a clean, polished feel, and the stitch definition is beautiful — the overall finish looks high quality! I highly recommend it, but cotton blends or acrylic yarns work great too if that’s what you have on hand.
If you’re looking for a fast crochet Christmas gift, this one’s perfect. It’s quick, fun, and beginner-friendly, working up in just a couple of hours.
Before we start this Free Wine Bottle Bag Pattern
Free Crochet Wine Bottle Holder Pattern: Start Here
Recommended yarn: I Love This Cotton Yarn #4 Worsted weight 100% cotton yarn. Color shown: Burnt Sienna.
Yarn Substitution: These yarns are a close match, but you should always swatch.
- Caron All Day Cotton
- Paint Box Cotton Aran Yarn
- Lion Brand Local Grown Cotton Yarn
- Caron Cotton Cakes Yarn
Yardage: About 113 yd
Crochet hook: (G) 4 mm
Materials:
- Tag: “Made With Love” metal Tag
- Tapestry needle: to weave in ends.
Gauge: 4” square =18 rows and 16 SC
Measurements: 12” in height and 5” in width when laid flat
Abbreviations
- CH: Chain
- ST: Stitch
- SLST: Slip stitch
- SC: Single crochet
- BLO: Back Loop only
- YO: Yarn over
- RS: Wrong side
- WS: Right side
- Rnd: Round
- Rep: Repeat
Pattern Notes
- This pattern is written in US terms.
- Skill level is easy.
- The wine tote is crocheted in the round, but you change direction after joining each round. (See details below.) Pay attention when “turning” your work is required.
Special Stitches
- Reverse single crochet (RSC): Also known as a Crab Stitch: Insert your hook into the stitch to the right, yarn over, and pull up a loop (2 loops on the hook), yarn over, and pull through both loops. That’s your 1st RSC. Watch here. Remember that for this pattern, you must skip one stitch between the RSCs.
- Crochet in rounds and turning: At the end of each round, join with a slip stitch to the first stitch of the round, CH 1, then turn your work and crochet the next round in the opposite direction. Watch here.
Merry Berry Wine Bottle Cover Crochet Pattern
This free crochet wine bottle carrier pattern has everything you need to make your own Merry Berry wine bag! In this post, you’ll find the full list of materials, stitch guide, and step-by-step instructions to create this beautiful handmade wine bottle holder.
If you’d prefer a printable, ad-free PDF version of this crochet wine bottle bag pattern, you can grab a copy for a small fee in any of my shops—links are below.
Prefer A Printable PDF?
Treat yourself to the ad-free, beautifully formatted version of this design for a small fee!
Step 1- Crochet the base
Rnd 1: Make a magic circle, 8 HDC in the circle, join with a SL ST into the 1st HDC, CH1. (8)
Rnd 2: 2 HDC in each ST around, join with a SL ST into the 1st HDC, CH1. (16)
Rnd 3: * 2 HDC in next ST, HDC in next ST,* rep *to* around, join with a SL ST into the 1st HDC, CH1. (24)
Rnd 4: * 2HDC in next ST, HDC in next 2 ST,* rep *to* around, join with a SL ST into the 1st HDC, CH1. (32)
Rnd 5: * 2 HDC in next ST, HDC in next 3 ST,* rep *to* around, join with a SL ST into the 1st HDC, CH1. (40)
Rnd 6: SC BLO in every ST around, join with a SL ST into the 1st SC, CH1. (40)
Close the magic circle by pulling the tail tight, securing it with a few knots.
Step 2 – Crochet the body
Rnd 1: (RS) Insert the hook in 1st ST (same ST as SL ST), pull up a loop, skip next ST, insert the hook in the next ST, pull up a loop, YO pull through all 3 loops, CH 1,* insert the hook in last ST already holding last ST, pull up a loop, skip next ST, insert the hook in the next ST, pull up a loop, YO, pull through all 3 loops, CH1* repeat * to* around join with a SL ST in the 1st ST, CH 1, turn. (20 clusters)
Row 2: (WS) Insert the hook in the 1st CH-1 sp, pull up a loop, skip next ST, insert the hook in next CH-1 sp, pull up a loop, YO pull through all 3 loops, CH 1, insert the hook in last CH-1 sp, pull up a loop, skip next ST, insert the hook in next CH-1 sp, pull up a loop, YO, pull through all 3 loops, CH 1,* rep *to*to the end, SC in last CH-1 sp already holding last ST, CH 1, turn. (20 clusters)
Rnd 3 – 32: Rep Rnd 2, turning your work at the end of each round. At the end of the last round, do not cut your yarn; crochet the handles next.
Step 3- Crochet the handles
Rnd 1: (RS) SC BLO in every ST around, SL ST into 1st SC, CH 1. Do not turn. (40)
Rnd 2: SC in 1st ST, SC BLO in next 10 ST, SC in the next ST, CH 18, skip next 8 ST, SC in next ST, SC BLO in next 10 ST, SC in the next ST, CH 18, skip next 8 ST, SC in next ST. Crochet continuously the next rounds.
Rnd 3: SC BLO in next 11 ST, SC in next 18 CH, SC BLO in next 12 ST, SC in next 18 CH, finish with a SL ST into the 1st SC, CH1. Do not turn; crochet the edging next.
Rnd 4: *RSC into the next ST to the right, skip next ST,* rep *to* around, join with a SL ST. Fasten off.
Weave in all ends, and you are all done!
I offer full support to help you with any questions or challenges you might have. Feel free to drop your comments in the section below or join our Facebook group, where I, along with my wonderful testers and community members, will be more than happy to assist you!