
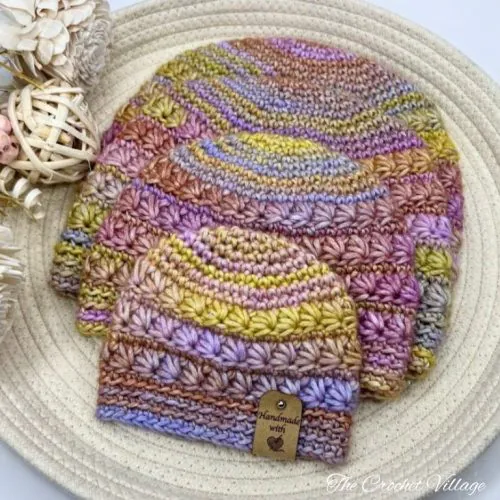
The Blossom Beanie – free crochet hat pattern featuring the beautiful star stitch and easy top-down construction. Designed in six sizes from preemie to adult, this cozy beanie works up quickly, looks stunning in variegated or solid yarn, and makes the perfect gift, market item, or donation project.

I’m so excited to share my latest free crochet hat pattern with you – the Blossom Beanie! This crochet beanie pattern quickly became one of my favorites, and I think it might be yours, too.
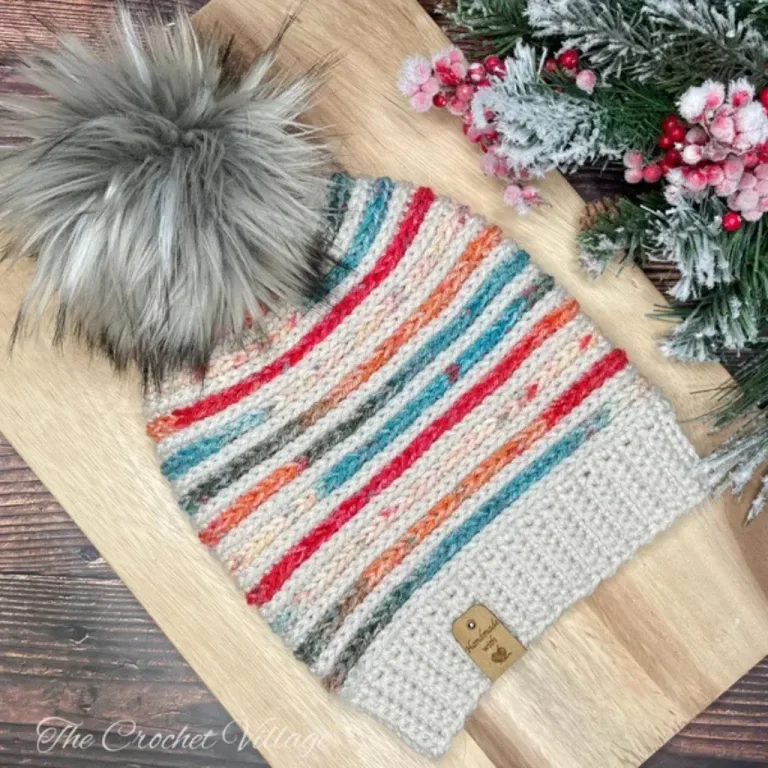
I used a gorgeous #4 worsted-weight variegated yarn to crochet this top-down beanie with the star stitch, and I’m completely obsessed with how the colors shift through the stitches, giving this winter hat such a stunning look. Of course, this star stitch looks just as beautiful in a solid color, too!
The crochet hat pattern is written in six sizes (from preemie all the way to adult), and each one has been tested for a great fit.
Keep reading to find the free pattern, or if you prefer a printable add-free PDF, you can find it on Etsy, Ravelry, and my online store!

This intermediate crochet pattern is truly a joy to create—it works up quickly, has beautiful textured crochet stitches, and fits perfectly across all sizes. It also makes a wonderful charity crochet project to donate to shelters and hospitals to keep others cozy this winter.
Whether you want to stay warm in style, make matching family hats, create something beautiful for gifting or selling, or crochet a few donation hats, this free beanie pattern has you covered!
Before we start this Free Star Stitch Crochet Hat Pattern
Free top-down Crochet Beanie Pattern: Start Here
Recommended yarn: 🧶Caron Blossom Cakes #4 worsted-weight yarn. Colors shown: Tropical Blooms or Radiant Rainbow
Yarn Substitution
- Red Heart Super Saver Bitty Stripes
- Lion Brand Yarn Mandala Ombré
- Lion Brand Yarn Ferris Wheel Yarn
- Bernat Super Value Yarn Ombre
Yardage: Depends on the size. I used: 140 yds for a Teen size
Crochet Hooks
- (H) 5 mm for the body
- 4.5 mm for the brim (optional)
Gauge: 4” square = 11 rows and 7 ST (star stitches, measured on the finished hat)
Other Materials
- Tag: Faux leather tags
- Faux Fur 6″ pom pom
- Tapestry needle.
Abbreviations
- CH: Chain
- ST: Stitch
- SL ST: Slip stitch
- SC: Single crochet
- BLO: Back loop only
- YO: Yarn over
- Rep: Repeat
Pattern notes
- This pattern is written in U.S terms.
- Skill Level: Intermediate
- The hat is worked in rounds from the top down.
- The crown is crocheted in continuous rounds. Use a stitch marker to mark the 1st st and move it up each round.
- The body of the hat is crocheted in rounds, but you join the rounds with SL ST.
Size and measurements
The pattern includes instructions for six sizes: Preemie, Infant, Toddler, Child, Teen, and Adult. Be sure to check the sizing chart for head measurements.
- The stitch counts and instructions for each size are written in parentheses and marked with different colors (available in the premium version only). Just follow the color that matches your size. Preemie, Infant, Toddler, Child, Teen, and Adult.
- The number at the beginning of each row shows the row count for that size.
- The number at the end of each row shows the stitch count for that size.
Tips for a perfect fit:
After finishing the crown, check the diameter and compare it to the pattern’s, referring to the sizing chart.
- If it’s smaller than the pattern, don’t add a row. Instead, go up a hook size and recheck. If it’s larger, go down a hook size and recheck.
- Keep your tension even throughout the pattern.
Click here for the sizing chart
| Age | Head Circumference | Crown Diameter | Hat Height |
| Preemie | 10”- 15” | 3 ½” | 4 ½” |
| Infant | 15”- 17” | 4 ½” | 5 ½” |
| Toddler | 17”- 19” | 5 ½” | 6 ½” |
| Child | 19”- 21” | 6” | 7 ¾” |
| Teen | 21”- 23” | 6 ½” | 8” |
| Adult | 23”- 24″ | 7 ¼” | 8 ½” |
How to crochet a star stitch
1st star stitch of the row:
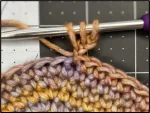
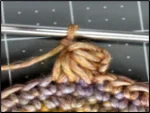
- CH3, Insert hook into the 2nd CH from hook and pull up a loop, insert hook in the next CH and pull up a loop. (3 loops on hook).(pic 1)
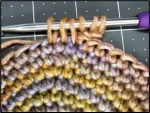
- Insert the hook into the ST, holding the CH 3, and pull up a loop. Insert hook and pull up a loop in each of the next 2 ST. (6 loops on hook). (pic2)
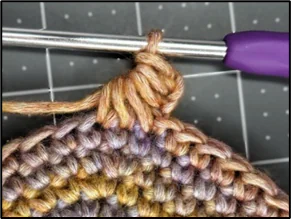
- YO and pull through all loops (pic 3), then CH1 to form the “eye” of the star. (pic 4)
Continue crocheting the next star stitches:
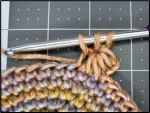
1- Insert your hook into the eye (CH1-sp) of the previous star and pull up a loop. Insert your hook into the leg of the previous star and pull up a loop (3 loops). (pic 5).
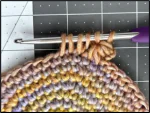
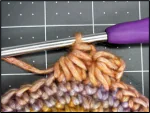
2- Insert hook in the last worked ST and pull up a loop (4 loops), insert hook and pull up a loop in the next unworked 2 ST (6 loops) (pic 6); YO and pull through all 6 loops, then CH1 to complete the star.
Blossom Hat Crochet Pattern
This free star stitch crochet hat pattern has everything you need to make your own Blossom Beanie! In this post, you’ll find the full list of materials and step-by-step instructions to create this gorgeous top-down hat in six sizes from preemie to adult.
If you’d prefer a printable, ad-free PDF version of this crochet beanie pattern, you can grab a copy for a small fee in any of my shops—links are below.
Prefer A Printable PDF?
Treat yourself to the ad-free, beautifully formatted version of this design for a small fee!
Step 2- Crochet the hat
** Color-coded sizes and a full photo tutorial are available in the premium version only**
Rnd 8 (10, 12, 13, 14, 15): SC in each ST around, SL ST in the 1st ST, CH3. 42 (54, 66, 72, 78, 84) ST
Rnd 9 (11,13, 14, 15, 16): Insert hook and pull up a loop in the 2nd and 3rd chains from hook, insert hook in the ST holding the CH3 and pull up a loop, insert hook and pull up a loop in each of the next 2 ST (6 loops), YO, pull through all loops, CH1, * insert hook and pull up a loop in the CH1-sp, in the leg of the star, in the last worked ST, and in each of the next 2 unworked ST for a total of 6 loops, YO, pull through all 6 loops, CH 1,* rep *to* around until 2 ST remaining (pic 1),
Work last star stitch as usual (pic 2), pull through all 6 loops but DO NOT CH1, SL ST to join into the top CH3 (pic 3), CH1. 21 (27, 33, 36, 39, 42) Star stitches
Rnd 10 (12,14, 15, 16, 17): SC BLO in each ST around (CH1 counts as a ST), join with SL ST into the 1st ST, CH3. 42 (54, 66, 72, 78, 84) ST
Rnd 11 (13,15, 16, 17, 18) to 13 (17, 21, 24, 25, 26): Rep Rnd 9 (11,13, 14, 15, 16) and Rnd 10 (12, 14, 15, 16, 17). Alternate SC BLO and Star Stitch rows, ending with a SC BLO row, for a total of 3 (4, 5, 6, 6, 6) Star Stitch rows. At the end of the last SC BLO row, do not join; optionally switch to a 4.5 mm hook and crochet the brim in continuous rounds.
Rnd 14 (18, 22, 25, 26, 27) to 17 (21, 25, 29, 31, 32): SC BLO in each ST around, ending with SL ST in the 1st ST. The brim should have a total of 4 (4, 4, 5, 6, 6) rows. Fasten off.
Weave in all ends, and you’re done!
I offer full support to help you with any questions or challenges you might have. Feel free to drop your comments in the section below or join our Facebook group, where I, along with my wonderful testers and community members, will be more than happy to assist you!




I’ll probably be the only one that pipes up about this. Just curious if you are aware that this is not actually the star ‘pattern’, it’s only half. It takes two rows to make the star. (Though I am not sure if the complete star pattern would work for your hat size wise with your design elements, but It might be possible.)
Theoriginal star pattern only has 5 loops. The hook loop, eye, the base and the next two stitches. The original pattern was modified by the yarn companies to eat more yarn. For example, by the time you’re done with two rows to make the complete star, it will have taken 70 more inches the way you’re doing it. As well by the time you’re done making a blanket it’s a whole additional cake or skein.
The Yarn companies and some of the designers also cooking up ways to put in extra stitches, lowers the respect level for them and the designers in my opinion.
You’re absolutely right that this is a modified/half-star stitch rather than the traditional star pattern. I chose to use “star stitch” in the title primarily for SEO purposes since that’s what most people search.
I’m not affiliated with any yarn companies, and I actually designed this version specifically to use less yarn while still creating that beautiful hat. The half star gives you the visual appeal and scales nicely across different sizes.
Thank you for the pattern.
You are very welcome! Enjoy 🙂
This is a beautiful pattern, thank you
You are very welcome! Enjoy 🙂
I love the look of this pattern. I can’t wait to make it! Thanks so much for your generosity!
You’re very welcome! I’m so happy you love it — happy crocheting!:)
Why does step 2 start with round 8?
Hi Susan,
Step 2 begins with Rnd 8 for the preemie size(Step 1 ends with Rnd 7 for the preemie size). So you’ll start at: Rnd 8 (10, 12, 13, 14, 15) — depending on the size you’re making. Hope this makes sense!
Dear Assia. just want to thank you and say how much I really love all your colour combinations . Fabulous. God bless you and yours.
Hi Pixie! Thank you so much for your sweet message! I’m so happy to hear you love the color combinations. Blessings to you and your family! 💕
Hi, I have a question about the SC BLO part. Do you stitch into the chain 1 space that kind of looks like a circle? And then I’m not sure what else counts as a stitch to BLO SC into. Thanks for any advice. This pattern is really pretty and I’m excited to learn a new stitch pattern.
Hi Shana, glad you’re enjoying the pattern! Look at the stitches from above and sc in the BLO of each stitch around. You should see two strands above each star stitch. Be sure to count your stitches at the end of the row so you don’t skip any.
I don’t understand the numbers in (. )
Hi Rosalinda! The stitch and row counts for each size are shown in parentheses.
The number at the beginning of each row indicates the row count for that size, and the number at the end shows the stitch count.
Love, love, LOVE!! Star stitch is my favorite ❣️Thank you for sharing this Assia ❤️
I’m so glad to hear that, Cindy! Enjoy 😊