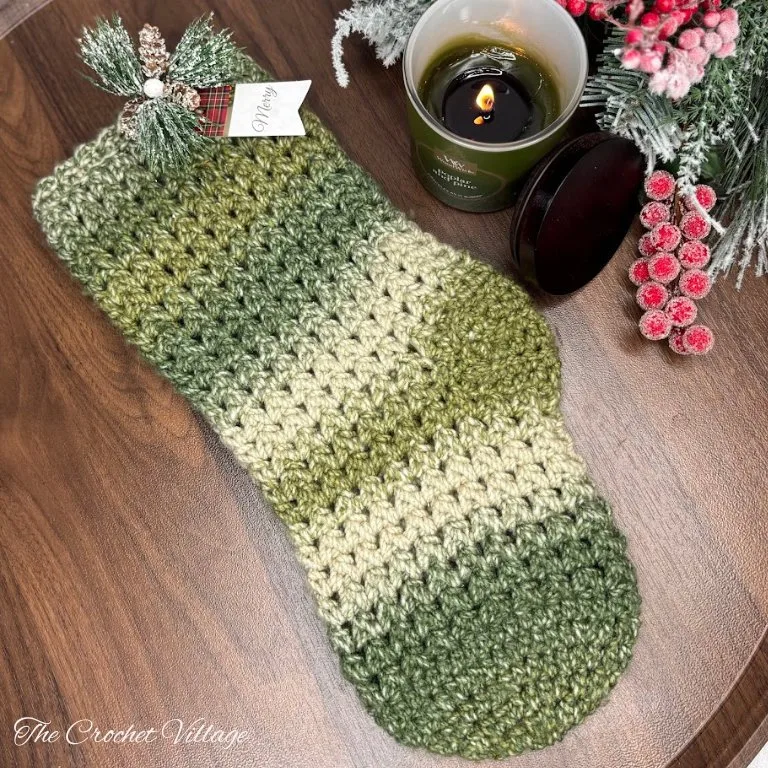
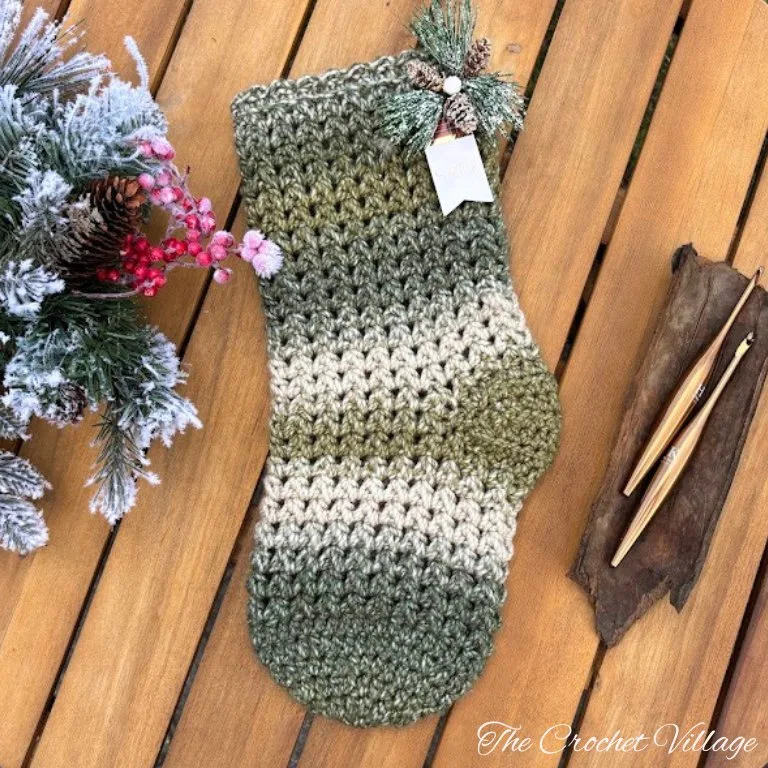
Looking for a cozy holiday project? This free crochet Christmas stocking pattern is beginner-friendly, oversized, beautifully textured, and full of holiday charm. You’ll love how quick and easy it is to make — and how stunning it looks hanging by the fireplace!

If you’ve been looking for the perfect handmade touch for your holiday décor, I think you’re going to fall in love with the Evergreen Free Crochet Christmas Stocking Pattern.
This beauty is large, wonderfully textured, and worked seamlessly in one piece. It works up quickly, making it perfect for last‑minute holiday projects or thoughtful handmade gifts. It’s also suitable for advanced beginners ready for a fun new crochet adventure.
I made mine with a soft #5 bulky yarn, which gives it a beautiful structure and firmness. But if you don’t have bulky yarn on hand, you can double up a #4 worsted-weight yarn for the same effect. The texture is just fantastic, and the generous size means it can hold plenty of treats, trinkets, and little surprises on Christmas morning.
Whether you’re making one for your mantel or creating a whole matching set for the family, this pattern is simple, fun, and full of festive charm.
Related: Free Crochet Patterns For Christmas Gifts and decorations| Christmas Collection | How to photograph crochet items
Before we start this free Crochet Christmas Stocking Pattern
Free Crochet Christmas Stocking- Start Here
Recommended Yarn: 🧶Loops & Threads Impressions Yarn #5 bulky weight yarn. Color shown: Olive
Yardage: About 200 yds
Yarn Substitution:
- Premier Yarns Puzzle Yarn
- Lion Brand Yarn Scarfie Bulky Yarn
- Red Heart Gemstone Diamond Yarn
- Paintbox Simply Chunky
- Bernat Softee Chunky Ombre Yarn
Crochet Hook: (K) 6.5mm
Other Materials:
- Faux leather tags
- Tapestry needle: to weave in ends.
Gauge: 4” square = 8 rows and 7 ST (pattern ST)
Finished Dimensions: W = 6“/ H = 15 1/2“
Abbreviations:
- CH: Chain
- ST: Stitch
- SL ST: Slip stitch
- SC: Single crochet
- RSC: Reverse single crochet
- HDC2tog: Half double crochet two together
- INC: Increase
- YO: Yarn over
- MS: Marked stitch
- SM: Stitch marker
- Rnd: Round
- Rep: Repeat
Pattern Notes
- This pattern is written in US terms.
- Skill level: Intermediate.
Special Stitches
- HDC2tog: Yarn over, insert your hook into the stitch, and pull up a loop. Yarn over, insert your hook into the next stitch, pull up a loop. You now have 5 loops on your hook. Yarn over and pull through all 5 loops.
- HDC INC: Place two HDC in the same stitch.
- Reverse single crochet (RSC): Work SC stitches from left to right, inserting the hook into the previous stitch (to the right), YO, pull through, yarn over, and pull through both loops. Watch here.
Construction
- This stocking is crocheted from the toe up, and it’s made of 4 connected parts: the toe, the foot, the heel, and the cuff.
- All parts of the stocking are crocheted in rounds except the heel, which is crocheted in rows.
- When you crochet the heel, you should turn your work at the end of each row.
- Keep your tension a little loose and even through the pattern.
Evergreen Free Crochet Christmas Stocking Pattern
In this free crochet Christmas stocking pattern, I’ll take you step‑by‑step through the process of making a beautiful handmade stocking you’ll love displaying year after year. 🎄
If you’d like an ad‑free PDF that you can easily print and save for future use, a premium version is available for a small fee in all my shops (links below). **The premium pattern includes a full high-quality photo tutorial**
Prefer A Printable PDF?
Treat yourself to the ad-free, beautifully formatted version of this design for a small fee!
Step 1- Crochet the toe
Rnd 1: Make a magic circle, CH1, 8 HDC in the circle, join with a SL ST into the 1st HDC, CH1. (8)
Rnd 2: 2 HDC in each ST around, join with a SL ST into the 1st HDC, CH1. (16)
Rnd 3: *2 HDC in next ST, HDC in next ST*, rep *to* around, join with a SL ST into the 1st HDC, CH1. (24)
Rnd 4: *2 HDC in next ST, HDC in next 2 ST*, rep *to* around, join with a SL ST into the 1st HDC, CH1.(32)
Rnd 5: *2 HDC in next ST, HDC in next 3 ST*, rep *to* around, join with a SL ST into the 1st HDC, CH 1. (40).
Rnd 6: HDC in each ST around, join with a SL ST into the 1st HDC, CH1, (40).
Close the magic circle by pulling the tail tight, then secure it with a few knots.
Step 2- Crochet the foot
Rnd 7: Keep your tension a little loose and even. YO, insert the hook in same ST as the SL ST, pull up a loop, YO, skip next ST, insert the hook in next ST, pull up a loop, YO, pull though all 5 loops on hook, CH 1, *YO, insert hook in last ST, pull up a loop, YO, skip next ST, insert the hook in next ST, pull up a loop, YO, pull though all 5 loops on hook, CH 1,* rep *to* around, join with a SL ST into the 1st HDC, CH1. (20 groups)
Rnd 8: *YO, insert hook in last CH1-sp, pull up a loop, YO, insert the hook in next CH1-sp, pull up a loop, YO, pull through all 5 loops on hook, CH 1,* rep *to* around, join with a SL ST into the 1st HDC, CH1. (20 groups).
Note: Crochet the 1st group in the last CH-1 space of the previous row (CH1-sp before the join). Tighten the tension here to minimize the seam’s visibility.
Rnd 9 -14: Rep Rnd 8. At the end of Rnd 14, join with a SL ST into the 1st ST (place a SM here), CH 1. Crochet the heel next.
Step 3 – Crochet the heel
You will switch from rounds to rows. After finishing the heel, fold it inside the stocking. Attach one corner, crochet across to the other corner, and attach it. Then, resume working in rounds. The heel sides stay open for now.
Row 1: HDC in same ST and each of next 14 ST ( CH1 counts as a ST), place a SM in last ST, CH 1, turn. (14 HDC)
Row 2: HDC2tog, HDC in each of next 10 ST, HDC2tog, CH 1, turn. (12 HDC)
Row 3: HDC2tog, HDC in each of next 8 ST, HDC2tog, CH 1, turn. (10 HDC)
Row 4: HDC2tog, HDC in each of next 6 ST, HDC2tog, CH 1, turn. (8 HDC)
Row 5: HDC INC in 1st ST, HDC in each of the next 6 ST, HDC INC in last ST, CH 1, turn. (10 HDC)
Row 6: HDC INC in 1st ST, HDC in each of the next 8 ST, HDC INC in last ST, CH 1, turn. (12 HDC)
Row 7: HDC INC in 1st ST, HDC in each of the next 10 ST, HDC INC in last ST, CH 1, do not turn. (14 HDC). Join the heel next.
Step 4 – Join the heel
1- Fold the heel in half, toward the inside of the stocking, SL ST into the base of the heel (in the MS), CH 1, *YO, insert hook, in next CH1-sp, pull up a loop, YO, insert the hook in next CH1-sp, pull up a loop, YO, pull though all 5 loops on hook, CH 1,* rep *to* around until you reach next MS. (13 groups)
2- Attach the other end of the heel with SL ST in the Last ST and the corner ST of the heel, CH1,
3- YO, insert the hook in the same 1st ST, pull up a loop, YO, skip next ST, insert the hook in next ST, pull up a loop, YO, pull through all 5 loops on hook, CH 1, *YO, insert hook in last ST, pull up a loop, YO, skip next ST, insert the hook in next ST, pull up a loop, YO, pull through all 5 loops on hook, CH 1,* rep *to* across (7 HDC groups), continue crocheting in the round.
4- YO, insert the hook in last ST, YO insert the hook in the next CH 1-sp, YO insert the hook in next CH 1-sp, YO pull through all 7 loops on hook, *YO, insert hook in last ST, pull up a loop, YO, skip next ST, insert the hook in next ST, pull up a loop, YO, pull though all 5 loops on hook, CH 1,* rep *to* around. You should have 20 groups total. Join with a SL ST into the 1st ST, CH1.
Note: from now on, you will crochet in rounds. The sides of the heel will remain open until you close them at the end. Crochet the cuff next.
Step 5 – Crochet the cuff
Rnd 15- 30: *YO, insert hook in last CH1-sp, pull up a loop, YO, insert the hook in next CH1-sp, pull up a loop, YO, pull through all 5 loops on hook, CH 1,* rep *to* around, join with a SL ST into the 1st ST, CH1. (20 groups).
Rnd 31: SC BLO in each ST around (CH1 count as a ST), join with a SL ST into the 1st SC, CH 1. (40 SC).
Rnd 32: *RSC in next ST to the right, skip next ST,* rep *to* around, join with a SL ST into the 1st SC. Fasten off. Crochet the hanger loop next.
Step 6 – Crochet the hanger loop
Slip knot, then SL ST in the top corner (on the heel side), CH14, SL ST the same ST to form a loop, CH1, SL ST in each CH around, SL ST in the first ST, fasten off.
Close the sides of the heels: Turn the stocking inside out. Sew the sides of the heel, using a tapestry needle and the yarn.
Weave in all ends, and you are all done!
I offer full support to help you with any questions or challenges you might have. Feel free to drop your comments in the section below or join our Facebook group, where I, along with my wonderful testers and community members, will be more than happy to assist you!