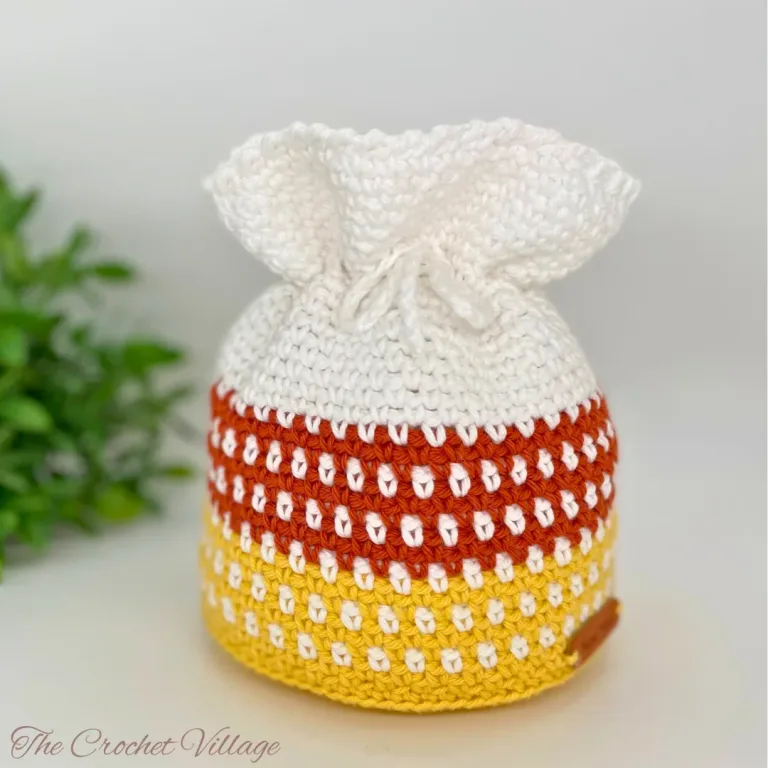
Looking for a fun and practical Halloween project? This free crochet candy corn bag pattern is perfect for beginners and works up super quickly! This adorable drawstring pouch is great for trick-or-treat candy, fall decorating, or gifting filled with treats.

Get Ready to Fall in Love with This Adorable Free Crochet Candy Corn Bag Pattern!
Halloween is creeping up fast, and if you’re anything like me, you’re already brainstorming fun ways to add some festive flair to your home.
I’m excited to share my latest obsession with you—this free crochet candy corn bag pattern that’s been stealing my heart (and all my free time). This adorable drawstring pouch captures everything we love about fall. The classic candy corn colors? Check. That cozy, handmade charm? Double check. The satisfaction of creating something both beautiful and functional? Triple check!
This Halloween crochet project is perfect to hold candies, but picture these little beauties scattered around your home or sitting pretty on a coffee table as fall decor, maybe filled with homemade treats or herbal autumn accents. You could even make mini versions as party favors or sweet gifts for anyone on your list.
The best part? This candy corn drawstring bag is beginner-friendly and works up fast, so whether you’re a seasoned crocheter or just starting your yarn journey, you can make it in any size to fit your needs perfectly.

Related: Crochet Bag Patterns | Crochet Fall Blankets | Free Fall Crochet Patterns
Before we start this Free Crochet Candy Cron Pouch pattern
Crochet Halloween Candy Corn Bag Pattern – Start Here
Pattern notes
- This pattern is written in US terms
- Skill level: Easy to intermediate.
- For sturdiness and better stitch definition, I recommend using cotton yarn.
Recommended Yarn: 🧶I Love This Cotton Yarn, #4 worsted-weight cotton yarn. Color shown: Curry: Yarn A, White: Yarn B, Bruschetta: Yarn C. Note: Feel free to use cotton blend or acrylic yarn.
Yardage
- Yarn A: About 240yds
- Yarn B: About 110 yds
- Yarn C: About 40 yds
Yarn Substitution
These yarns are a close match, but you should always swatch.
Finished Dimensions: Height=8“ x Width=9”
Crochet Hooks:
- 4 mm hook for the base.
- 5 mm hook for the body.
Gauge: 4” square = 17 rows and 16 SC.
Other Materials
- Tag: I used a faux leather tag
- Tapestry needle: to weave in ends
Abbreviations
- CH: Chain
- ST: Stitch
- SL ST: Slip stitch
- SC: Single crochet
- BLO: Back loop only
- RSC: Reverse single crochet
- YO: Yarn over
- SP: space
- Rnd: Round
- Rep: Repeat
Special stitches
Reverse Single Crochet (RSC): Insert the hook to the right into the next CH-1 sp, YO, draw the loop back to the front, YO again, and draw that loop through the two loops already on the hook. Watch here.
Color changing
To change color, finish the last stitch of the row with the old yarn, but stop before the final yarn over.
- Introduce the new yarn by holding it behind your work, yarn over with the new yarn, and pull it through the last loops of the stitch.
- Drop the old yarn and continue crocheting with the new yarn as usual.
- Do not cut the old yarn when you finish using it. You’ll pick it up again when you need to use it.
Free crochet Halloween Bag pattern: Candy Corn Pouch
In this free crochet Halloween pouch pattern, I’ll walk you through everything you need to get started and give you easy-to-follow directions for creating your own candy corn bag. Want a clean, printable version without any ads? You can grab the premium PDF right now from any of my shops I’ve linked down below.
Prefer A Printable PDF?
Treat yourself to the ad-free, beautifully formatted version of this design for a small fee!
Step 1- Crochet the Base
Use a 4 mm and Yarn A to make a magic circle
Rnd 1: 8 HDC in the circle, join with a SL ST into the 1st ST, CH1.(8)
Rnd 2: 2 HDC in each ST around, join with a SL ST into the 1st HDC, CH1. (16)
Rnd 3: *2 HDC in next ST, HDC in next ST,* rep *to* around, join with a SL ST into 1st HDC, CH1. (24)
Rnd 4: *2 HDC in next ST, HDC in next 2 ST,* rep *to* around, join with a SL ST into 1st HDC, CH1.(32)
Rnd 5: *2 HDC in next ST, HDC in next 3 ST,* rep *to* around, join with a SL ST into the 1st HDC, CH1. (40)
Rnd 6: *2 HDC in next ST, HDC in next 4 ST,* rep *to* around, join with a SL ST into the 1st HDC, CH1.(48)
Rnd 7: *2 HDC in next ST, HDC in next 5 ST,* rep *to* around, join with a SL ST into the 1st HDC, CH1. (56)
Rnd 8: *2 HDC in next ST, HDC in next 6 ST,* rep *to* around, join with a SL ST into the 1st HDC, CH1. (64)
Rnd 9: *2 HDC in next ST, HDC in next 7 ST,* rep *to* around, join with a SL ST into the 1st HDC, CH1. (72)
Rnd 10: *2 HDC in next ST, HDC in next 8 ST,* rep *to* around, join with a SL ST into the 1st HDC, CH1. (80)
Rnd 11: *2 HDC in next ST, HDC in next 9 ST,* rep *to* around, join with a SL ST into the 1st HDC, CH1.(88)
Rnd 12: SC in BLO in each ST around. (88). Change to a 5 mm hook.
Close the magic circle by pulling the tail tight, then secure it with a couple of knots. Crochet continuously next rounds.
Step 2- Crochet the Bag
- Use a stitch marker to mark the beginning of the rounds and move it up each round.
- Use a 5 mm hook and keep your tension nice and even.
Rnd 1: Yarn A. SC in the next ST (use a ST marker here), *CH1, skip next ST, SC in next ST,* rep *to* around. Crochet continuously next Rnd.
Rnd 2: Yarn A. *SC in next CH-1 sp, CH1,* rep *to* around. Add Yarn B in the last ST, drop Yarn A.
Rnd 3 – 28: Rep Rnd 2 in continuous rounds. Change colors at the end of each round, following the color sequence below. Drop the previous color and continue crocheting with the new color.
- Rnd 1 – 2: Yarn A
- Rnd 3: Yarn B
- Rnd 4-5: Yarn A
- Rnd 6: Yarn B
- Rnd 7 – 8: Yarn A
- Rnd 9: Yarn B. At the end of Rnd 9, cut Yarn A and add Yarn C
- Rnd 10 – 11: Yarn C
- Rnd 12: Yarn B
- Rnd 13-14: Yarn C
- Rnd 15: Yarn B
- Rnd 16- 17: Yarn C. Cut Yarn C at the end of Rnd 17
- Rnd 18 – 28: Yarn B
Rnd 29 (Drawstring round): Yarn B. *Skip next ST, SC BLO in next ST, CH1,* rep *to* around.
Rnd 30 – 40: Yarn B. Rep Rnd 2. Finish last Rnd with a SL ST in next ST, CH1. Crochet the edging next.
Step 3- Crochet the edging
Rnd 41: With the yarn still on your hook, RSC to the right into the next CH-1 sp, skip the next ST to the right, * rep *to* around. Join with a SL ST. Fasten off.
Step 4- Finish the bag
- Crochet the string: CH 100, secure both ends with a couple of knots, fasten off.
- Use the crochet hook to thread the string through Rnd 29, 2 SC at a time.
- Attach the tag using a tapestry needle and the yellow yarn.
- Weave in all ends.
Make the base firm ~ optional
- Make another base (you may also use fabric stabilizer)
- Turn the bag inside out, then place the 2nd base on top of the 1st one.
- With Yarn B and a tapestry needle, sew both bases together all the way around, one ST at a time.
- Cut and weave in all ends.
Line your bag ~ optional
Lining the bag is easy – no need for major sewing skills (hand sewing works!). You will make a fabric pouch the same size as your crocheted bag, slide it in, and stitch up the top.
I offer full support to help you with any questions or challenges you might have. Feel free to drop your comments in the section below or join our Facebook group, where I, along with my wonderful testers and community members, will be more than happy to assist you!