
Create a gorgeous, handmade Christmas Tree Crochet Gift Bag with this free, easy pattern! This small drawstring bag is perfect for Christmas gifting—ideal for gift cards, treats, and tiny treasures. Easy, cute, and full of holiday charm!

I’m so excited to share this free Christmas Tree Crochet Gift Bag pattern with you! 🎄 This little drawstring bag may be small, but it’s packed with gorgeous, charming details that make it feel extra special. It’s easy to make, which is one of the reasons I keep coming back to it year after year. Honestly, I’ve made so many of these—they’ve become a handmade holiday favorite in my home!
From the pretty scalloped double-layer top edging to the delicate sparkle of added gold thread for that festive touch, this bag turns simple yarn into something truly delightful. It’s just the right size for holding small gifts, gift cards, candy, or tiny treasures.
The pattern is easy and suitable for advanced beginners. It does involve some color changes, and if you’re new to tapestry crochet, don’t worry—the free pattern will guide you through it step by step. You’ll be surprised how quickly it all comes together!

As for the yarn, any #2 weight yarn will work beautifully. For my version, I used a double strand of a #1 weight yarn I had on hand and added a touch of gold thread to the contrast yarn—and I just loved the way it turned out.
Keep reading to find the free pattern, or if you prefer a printable add-free PDF, you can find it on Etsy, Ravelry, and my online store!
This Christmas Tree Gift Bag is part of my Holiday Gift Bag Set—a cheerful collection of small, easy, and beautiful handmade bags perfect for Christmas gifting. You can check them out here [Christmas Gift Bag Collection].
Related: Free Crochet Patterns For Christmas Gifts and Decorations.
Christmas Gift Bag Collection
- 🎁 Merry Mini Gift Bag Pattern
- 🎅 Jolly Mini Gift Bag Pattern
- 🎄 Christmas Tree Mini Gift Bag Pattern
- 🦌 Reindeer Mini Gift Bag Pattern
- ❄️ Snowflake Mini Gift Bag Pattern
- 🌟 Noel Mini Gift Bag Pattern
Before we start this Free Crochet Christmas Tree Gift Bag Pattern
Free Crochet Christmas Tree Gift Bag Pattern-Start Here
Recommended Yarn: I used two strands of #1 super fine yarn, and added a gold thread with the contrast color. You can use any #2 sport weight yarn.
- Loops & Thread Woolike Yarn, #1 superfine weight yarn (double strand), Colors shown: Beige: Yarn A. Olive: Yarn B. Red: Yarn C
- Yarn Bee Bejeweled Sequin Gold: Hold together with Yarn B and C.
Yardage: About 271 yds total
Yarn Substitution
Crochet Hook: 3 mm
Gauge: 4”square = 19 Rows x 20 ST
Finished measurements: H= 5 ½ ” / W= 4 ½”
Abbreviations
- CH: Chain
- ST: Stitch
- SLST: Slip stitch
- SC: Single crochet
- DC: Double Crochet
- TR: Treble crochet
- BLO: Back loop only
- FLO: Front loop only
- YO: Yarn over
- Rnd: Round
- Rep: Repeat
Pattern notes
- This pattern is written in US terms.
- Skill level is intermediate.
- Keep your tension even.
Special Stitches
- Single crochet in the back loop only (SC BLO): Insert your hook only into the back loop of the stitch from the previous row, rather than both loops as you would in a regular single crochet stitch.
- Single crochet in the front loop only (SC FLO): Insert your hook only into the front loop of the stitch from the previous row, rather than both loops as you would in a regular single crochet stitch.
- Picot Stitch: CH 3, SL ST in 3rd CH from the hook.
Color changing in tapestry crochet
Before you begin this project, you’ll need to be familiar with :
- Color changing: This tutorial will guide you through the basic techniques. Read through the instructions below thoroughly and practice if needed. Watch this tutorial for extra help.
- Reading a chart: Watch how to read a tapestry graph.
1- Incorporating The Contrast Yarn
- Insert your hook into the back loop only of the first single crochet.
- Place the contrast yarn over the hook.
- Yarn over with your working yarn and pull up a loop.
- Yarn over again and pull through both loops on the hook.
- Continue crocheting with your main yarn as usual.
- Carry the contrast yarn behind your stitches by crocheting over it.
- Keep carrying the contrast yarn even if it’s not needed right away.
2- How to Change Colors
- When the pattern or chart tells you it’s time to switch to Yarn B, start your last stitch with Yarn A as usual.
- Insert your hook into the stitch and pull up a loop with Yarn A.
- Now yarn over with Yarn B instead of Yarn A.
- Pull through both loops on the hook to finish the stitch with Yarn B.
- From this point on, crochet with Yarn B.
- Keep carrying Yarn A behind your stitches by crocheting over it.
3- Design Specific
In this pattern, the contrast yarn isn’t carried all the way around. Once you’ve finished using it, simply drop it. You’ll pick it up again in the next round when the pattern calls for it.
- After switching to Yarn B, carry Yarn A by crocheting over it like in tapestry crochet.
- When you’re done with Yarn B, drop it—don’t carry it along.
- Keep going with Yarn A.
- In the next row, Yarn B will be on the opposite side of the motif.
- When you need it again, bring it back, switch to Yarn B, and carry Yarn A behind your stitches.
- When bringing back Yarn B, there will be a visible strand on the back.
- Keep that strand a little loose, and crochet over it to hide it.
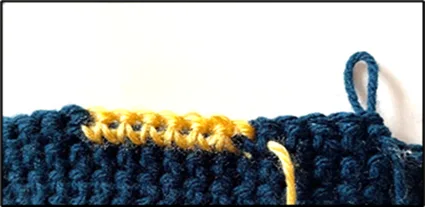
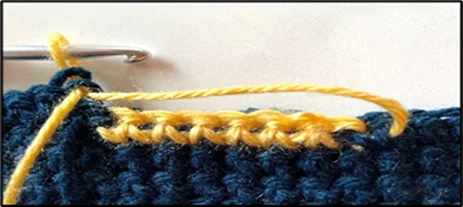
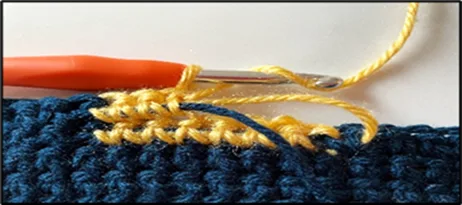
Christmas Tree Crochet Gift Bag
In this blog post, you’ll find everything you need to crochet your own cute Christmas Tree Gift Bag. If you prefer a convenient, printable, ad-free PDF, it’s available for purchase in all my shops—just check the links below!
This pattern is also part of a Christmas gift bag set, a 5-in-1 bundle that includes all the matching Christmas gift bags.
Prefer A Printable PDF?
Treat yourself to the ad-free, beautifully formatted version of this design for a small fee!
Step 1- Crochet the bag
Note: The Tree is crocheted on one side only.
Rnd 1: With Yarn A, chain 22 to make a foundation chain. 2 SC in 2nd CH from hook, SC in next 19 ST, 3 SC in the last CH. Continue crocheting along the back, unused loops of the foundation chain, SC in the next 19 ST, SC in the last CH already holding 2 SC. Place a stitch marker here and move it up each row. (44) ST around. From now on, crochet continuously in SC BLO.
Rnd 2- 3: Yarn A. SC BLO in each ST around.
Rnd 4-16: SC BLO in each stitch around. Add Yarn B (along with the gold thread) in row 4, 6th ST, then follow the chart for color changes. At the end of Round 16, cut Yarn B.
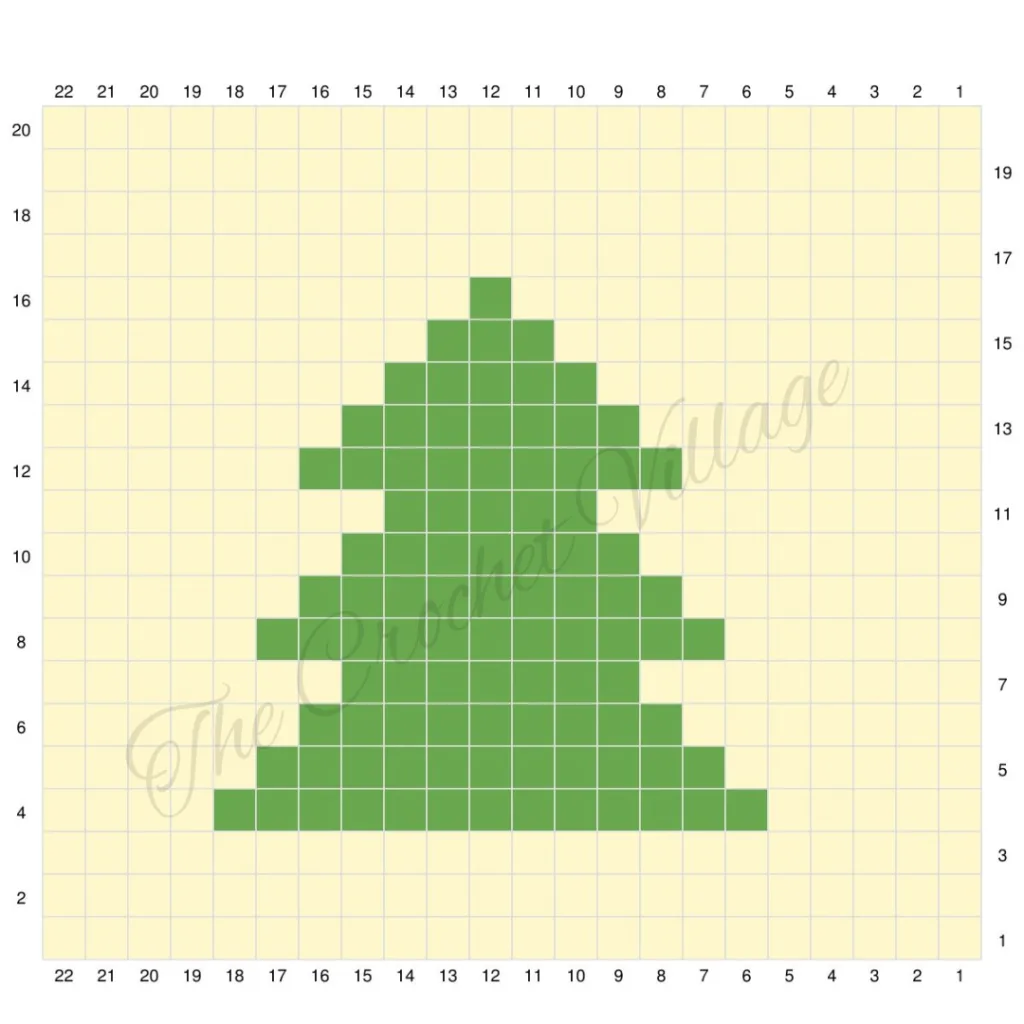
Remember: Yarn B will be on the opposite side of the motif. Bring it back when you need to use it, change to yarn B, and carry Yarn A. When bringing back Yarn B, there will be a visible thread behind the work. Keep it slightly loose, and crochet over it to hide it.
Rnd 17-20: Yarn A. SC BLO in each ST around.
Rnd 21: Yarn A. SC FLO (in the front loops only) in every ST around. Crochet the top part next
Step 2- Crochet the top part of the bag
Rnd 22: With the yarn still on your hook, *SC BLO in next ST, 2 SC BLO in next ST,* rep *to* around. (66)
Rnd 23-24: SC BLO in each ST around. (66)
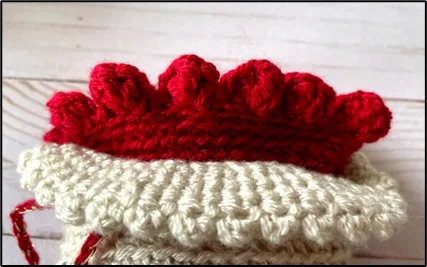
Rnd 25: Crochet in both loops.*SL ST in the next ST, Picot ST( in both loops), skip next ST,* rep *to* around ending with a SL ST in the last ST. Fasten off.
Crochet The Inside layer
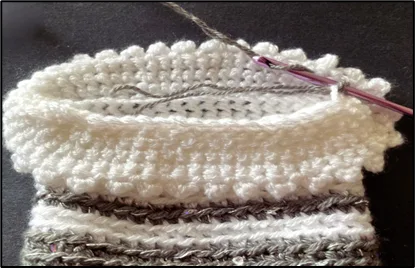
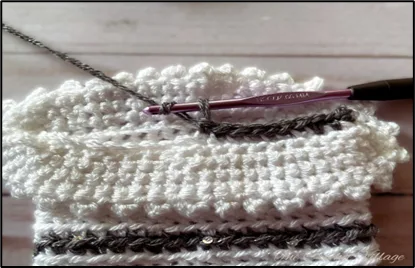
Fold the top of the bag out to find the unused back loops of Rnd 21 (visible line). With yarn C (without the gold thread), SL ST into the 1st ST at the corner of Round 21’s backside. SC in each ST around, then continue to the next round.
Rnd 22-24: SC BLO in every ST around, crochet continuously next round.
Row 25: Crochet in both loops. (2 DC, TR, 2 DC) in next ST, SL ST in next 2 ST,*(2 DC, TR, 2 DC) in next ST, SL ST in next 2 ST,* rep *to* around, finish with a SL ST. Fasten off.
Step 3 – Crochet the drawstring
With yarn C (+gold thread), chain 80, secure both ends with a couple of knots, then cut your yarn. With the crochet hook, thread the drawstring through Rnd 21, two stitches at a time. Weave in all ends, and you are all done!
I offer full support to help you with any questions or challenges you might have. Feel free to drop your comments in the section below or join our Facebook group, where I, along with my wonderful testers and community members, will be more than happy to assist you!




This little bag just says vintage! Gift cards, sachet, soap bag… Pattern is easy to follow and looks amazing!