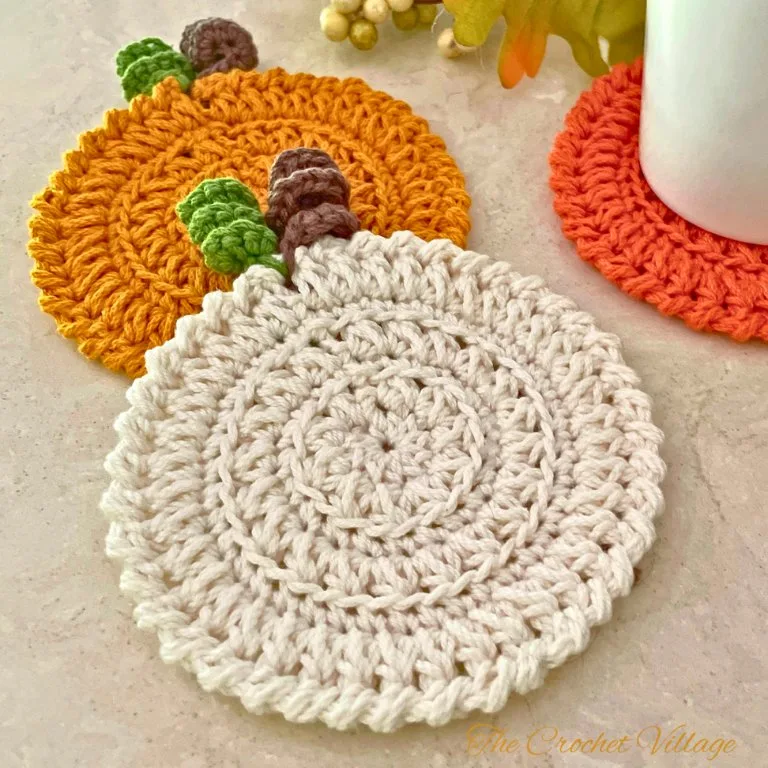
Got some leftover yarn in fall colors? 🍂🎃 Whip up these cute, textured, and practical pumpkin-inspired coasters! They’ll protect your furniture, add handmade charm to your fall décor, and make the sweetest little gifts everyone will love.

Looking for a quick and easy crochet project that screams autumn charm? This adorable free crochet pumpkin coaster pattern is exactly what you need to add handmade warmth to your fall decor!
These pumpkin coasters aren’t just cute – they’re super functional too. They’ll protect your furniture while adding that special handmade fall charm to your coffee table, dining room, or anywhere you want a pop of seasonal spirit. Plus, they make fantastic last-minute gifts for teachers, neighbors, or anyone who loves autumn crafts as much as you do.
The Pumpkin Patch Coaster pattern is beginner-friendly, works up fast, and creates gorgeous textured coasters that are both practical and fun to make.
I made mine using mercerized cotton yarn (I had some leftover yarn stash in fall colors – I had to use it!), and they turned out absolutely fantastic. The texture is gorgeous, the stitch definition is crisp and clean, plus they have this lovely little shine that really brightens up the table. I just love how they turned out! Any worsted-weight cotton yarn will work perfectly for this Halloween crochet pattern.
Keep reading to find the free pattern, or if you prefer a printable add-free PDF, you can find it on Etsy, Ravelry, and my online store!
Related: Free Fall Crochet Patterns
Before we start this Free Crochet Pumpkin Coaster Pattern
Free Crochet Pumpkin Coaster Pattern: Start Here
Pattern notes
- Terminology: Written in US terms
- Difficulty: Easy
- For best results, I highly recommend using cotton yarn.
- I used a smaller hook than the yarn recommends because I wanted to keep my stitches tight and give the coaster more body. Feel free to go up a hook size, especially if you’d like a slightly larger coaster.
Recommended yarn: Lion Brand 24/7 Cotton Yarn, #4 worsted-weight cotton yarn. Colors shown:
- Goldenrod
- Tangerine
- White
- Grass
- Café Au Lait
Yarn substitution
- Premier Home Cotton yarn
- Caron All Day Cotton
- Yarn Bee Fundamental Cotton
- Lilly Sugar’n Cream Cotton yarn
Yardage: About 30 yd/coaster
Crochet hooks
- (G) 4 mm
- (D) 3 mm for the edging
Other materials: Tapestry needle: to weave in ends.
Gauge: Not important for this project. My finished coaster measures 4 ½” across — adjust your hook size if needed.
Measurements: 4 1/2” in diameter
Abbreviations
- CH: Chain
- ST: Stitch
- SLST: Slip stitch
- SC: Single crochet
- HDC: Half double crochet
- BLO: Back loop only
- RSC: Reverse single crochet
- Rnd: Round
- YO: Yarn over
- Rep: Repeat
Special stitches
Reverse Single Crochet (RSC): Insert the hook to the right into the next ST, YO, draw the loop back to the front, YO again, and draw that loop through the two loops already on the hook. Watch here.
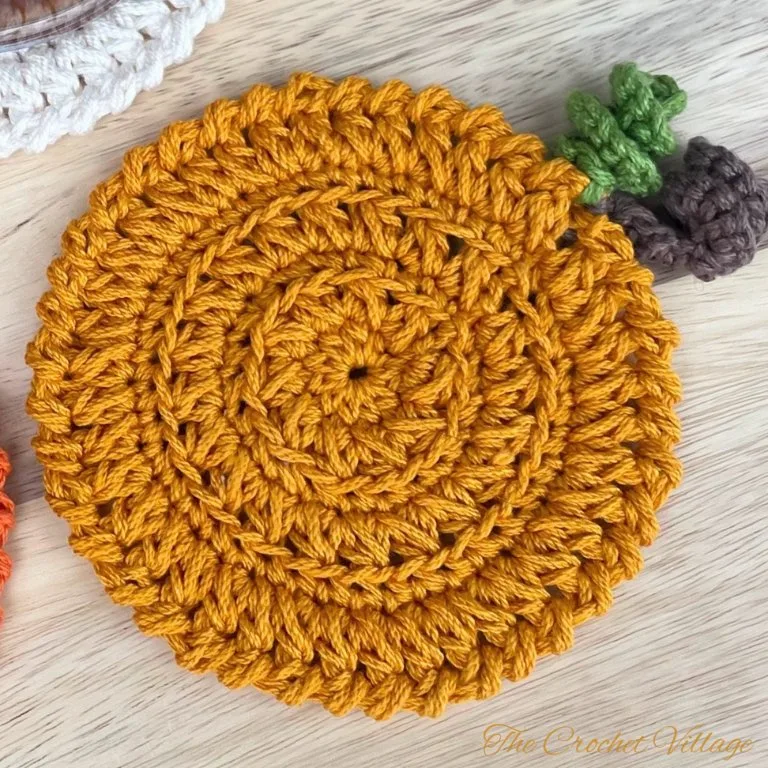
Crochet Pumpkin Patch Coaster Pattern
This free crochet fall pumpkin-inspired coaster pattern has everything you need to make your own Pumpkin patch coasters. In this post, you’ll find the complete materials list and detailed step-by-step instructions to guide you through every stitch.
Prefer A Printable PDF?
Treat yourself to the ad-free, beautifully formatted version of this design for a small fee!
Step 1- Crochet the Coaster
With a 4 mm hook, make a magic circle and CH 1.
Rnd 1: Work 10 HDC in the circle. Join with a SL ST into the 1st HDC, then CH 1. (10 HDC). Close the magic circle by pulling the tail tight, then secure it with a couple of knots.
Rnd 2: YO, insert the hook into the same ST holding the CH 1 and pull up a loop. YO, insert the hook into the next ST, and pull up a loop. YO, pull through all 5 loops on the hook, then CH 1.
*YO, insert the hook into the last ST worked, and pull up a loop. YO, insert the hook into the next ST, and pull up a loop. YO, pull through all 5 loops on the hook, then CH 1.
Repeat from * around. Join with a SL ST into the 1st ST, then CH 1. (10 clusters)
Rnd 3: Work 1 SC BLO in every ST around. Join with a SL ST into the 1st ST, then CH 1. (20 SC BLO)
Note: Your work may be a little wavy at this stage, but it will straighten out at the end.
Rnd 4: Repeat Rnd 2. (20 clusters)
Rnd 5: Repeat Rnd 3. (40 SC BLO)
Rnd 6: Repeat Rnd 2. (40 clusters) Change to a 3 mm hook.
Rnd 7: Work 1 RSC in each ST around. Join with a SL ST, then fasten off and cut your yarn.
Weave in and trim all ends.
Step 2 – Crochet the Curly Cues (make 2)
With the contrast yarn and a 4 mm hook, CH 11. Work 3 SC in the 2nd CH from the hook, then work 3 SC in each CH across to the end. Do not cut the yarn.
Attach the curly cue to the coaster with a SL ST into the last ST of the coaster. Fasten off.
Weave in the ends, and you are all done!
I offer full support to help you with any questions or challenges you might have. Feel free to drop your comments in the section below or join our Facebook group, where I, along with my wonderful testers and community members, will be more than happy to assist you!