
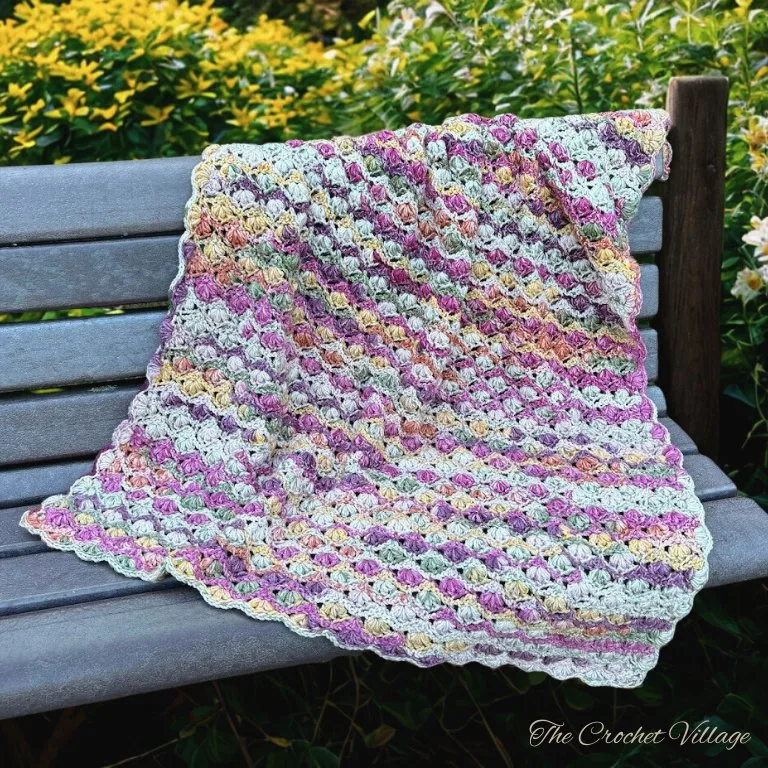
Create the stunning Meadow Blanket with this free puff stitch crochet pattern! Perfect for advanced beginners, this reversible throw features a beautiful texture and drapes wonderfully. Made with variegated yarn, it works up quickly and showcases the puff stitches beautifully. Includes instructions for customizable sizes from lapghan to king. Cozy, gorgeous, and a joy to make!

I’m thrilled to introduce you to the Meadow Blanket, a stunning free crochet blanket pattern featuring an easy puff stitch design that you’ll enjoy making. This gorgeous throw is reversible, featuring a lovely design that drapes beautifully and is finished off with a matching border that blends seamlessly into the design.
Perfect for advanced beginners eager to learn new stitches and beyond, this easy puff stitch blanket works up quickly using a fun combination of easy stitches. I crocheted mine with a stunning variegated worsted-weight anti-pilling yarn, and I absolutely LOVE the colorway — it gives the blanket a vibrant, playful look that beautifully highlights the puff stitches. The result is a gorgeous, unique throw you’ll be proud to gift and love using!
Keep reading to find the free pattern, or if you prefer a printable add-free PDF, you can find it on Etsy, Ravelry, and my online store!

The anti-pilling acrylic yarn behaves much like cotton, providing excellent stitch definition while being super soft and easy to work with. The textured crochet blanket isn’t heavy or lacy — it strikes just the right balance of texture and warmth.
I made my version in a lapghan size, but I’ve included detailed instructions so you can easily customize this blanket pattern to any size you want — from baby blanket to throw to king size!
Ready to start your new favorite easy crochet project? Let’s get going!
Related: How to photograph crochet items – Blanket Collection
Free & Pretty Crochet Blanket Pattern – Start Here
Pattern notes
- This pattern is written in US terms.
- Skill level: Intermediate.
- The pattern is for a lap blanket. Instructions are included to make other sizes
Recommended yarn: 🧶Yarn Bee Soft & Sleek Yarn, #4 worsted weight yarn. Colors shown: Tropical Tiki
Yarn Substitution:
- Red Heart Super Saver Bitty Stripes
- Lion Brand Yarn Mandala Ombré
- Lion Brand Yarn Ferris Wheel Yarn
- Bernat Super Value Yarn Ombre
Yardage: About 1,543 yds
Crochet hook: (K) 6.5mm
Abbreviation:
- CH: Chain
- ST: Stitch
- SL ST: Slip stitch
- SC: Single crochet
- HDC: Half double crochet
- DC: Double crochet
- BLO: Back loop only
- HDC2tog: 2 half double crochet stitches together
- SP: Space
- YO: yarn over
- SK: Skip
- Rnd: Round
- Rep: Repeat
Gauge: 5”= 2 puff groups and 3 SC (pattern stitches measured on the finished blanket), and 10 rows.
Measurements: Approximately 45″ long and 35″ wide. For other sizes, refer to the details below.
Special stitches:
- Puff stitch (Pff): YO, insert hook into the ST, YO, and pull up a loop (you’ll have 3 loops on your hook). YO, insert hook into the same ST again. YO and pull up a loop (you’ll have 5 loops on your hook).YO, insert hook into the same stitch one more time. YO and pull up a loop (you’ll have 7 loops on your hook). YO and pull through all 7 loops on your hook.
- HDC2tog: YO, insert hook into the ST, YO, and pull up a loop (3 loops on your hook), YO, insert hook into the same ST. YO and pull up a loop (5 loops on your hook). YO and pull through all 5 loops on your hook.
How to make the Meadow Blanket in other sizes
Refer to the sizing table below. Start with a foundation chain in a multiple of 8 + 2 to reach your desired width. Then repeat the pattern rows until you reach the desired length, ending with Row 2.
Click here for the sizing chart
| Blanket type | Dimensions (inches) |
| Stroller | 30 x 30 |
| Receiving | 30 x 36 |
| Toddler | 40 x 60 |
| Lap | 36 x 45 |
| Throw | 48 x 60 |
| Twin Bed | 70 x 90 |
| Queen Bed | 90 x 90 |
| King Bed | 100 x 100 |
Free crochet blanket pattern: Meadow Throw Blanket
In this free crochet blanket pattern, I’ll share all the materials you need and provide step-by-step instructions to make the Meadow Blanket in any size. If you prefer a printable, ad-free PDF, the premium version is available for purchase in all my shops linked below. ** A full photo tutorial is available in the premium pattern only**
Prefer A Printable PDF?
Treat yourself to the ad-free, beautifully formatted version of this design for a small fee!
Step 1- Crochet the blanket
CH 138 to make a foundation chain,
Row 1: SC in 2nd CH from hook,*CH1, sk next 3 CH, 3 (Pff, CH 1) in next CH, sk next 3 ST, SC in next CH,* rep *to* across, turn. (137)
Row 2: CH 3, DC in same ST, *CH 2, sk next Pff, SC in the next Pff, CH 2, sk next Puff, 3 DC in the next SC,* rep *to* across, ending with 2 DC in the last SC, turn.
Row 3: CH 3, (HDC, CH 1, 1 Pff) in same ST, CH 1,* SC in next SC, CH 1, sk next DC, 3 (Pff, CH 1) in next DC,* rep *to* across ending with (Pff, CH 1, HDC2tog) in the last ST, turn.
Row 4: CH 1, SC in same ST, *CH 2, sk next Pff, 3 DC in next SC, CH 2, sk next Pff, SC in next Pff,* rep *to* across ending with CH 2, sk last Pff, SC in last ST, turn
Row 5: CH 1, SC in same ST, *CH 1, sk next DC, 3 (Pff, CH 1) in next DC, SC in next SC,* rep *to* across, ending with SC in last ST
Rows 6 -100 (or to the desired length): Rep rows 2 to 5, ending with row 2. At the end of the last row, turn, and crochet the border next.
Step 2- Crochet the border
Round 1:
- CH 3, 3 (Pff, CH 1) in same ST, CH 1,*SL ST in next SC, CH 1, sk next DC, 3 (Pff, CH 1) in next DC,* rep *to* to corner, 3 (Pff, CH 1) in the corner, do not turn,
- Crochet down the side of the blanket: *sk next row, SL ST in next row, CH1, 3 (Pff, CH1) in next row,* rep *to* corner, 3 (Pff, CH 1) in the corner.
- Crochet along the foundation chain: *SL ST in the CH holding the next 3 Pff, CH1, 3 (Pff, CH1) in the CH holding the next SC,* rep *to* to corner, 3 (Pff, CH 1) in the corner.
- Crochet up the edge,*sk next row, SL ST in next row, CH1, 3 (Pff, CH1) in next row,* rep *to* corner. Join with SL ST in the 1st ST, do not turn.
Round 2: SL ST BLO in each ST and CH around. Join with SL ST into the 1st ST.
Fasten off and weave in all ends. You’re all done!
I offer full support to help you with any questions or challenges you might have. Feel free to drop your comments in the section below or join our Facebook group, where I, along with my wonderful testers and community members, will be more than happy to assist you!




Thank you for the pattern. I ordered extra yarn because I want to make a throw. I’m not sure how to make it bigger without knowing how many stitches to start with. Could you please advise me on this? Thanks.
You’re welcome! 😊
To make it bigger, start with a chain in a multiple of 8 + 2 for the width you want, then repeat the rows until you reach your desired length, ending with Row 2. Sizing instructions can be found in the “How to Make the Meadow Blanket in Other Sizes” section of the pattern. Enjoy!💛
do you have a YouTube video of this pattern? please
I don’t have a video tutorial for this pattern, but the premium version includes high‑quality step‑by‑step photos to guide you through the process.
I want to make a throw blanket which is 12 inches wider than the lap. how do I figure out how many chains to add? I know it is 8 + 2 I just can’t figure out how many I need to makes 12 inches.
thank you, stumped
Just make a foundation chain in multiples of 8, adding 8 stitches at a time until it’s about 12″ long (measure as you go). Then add 2 stitches at the end 🙂