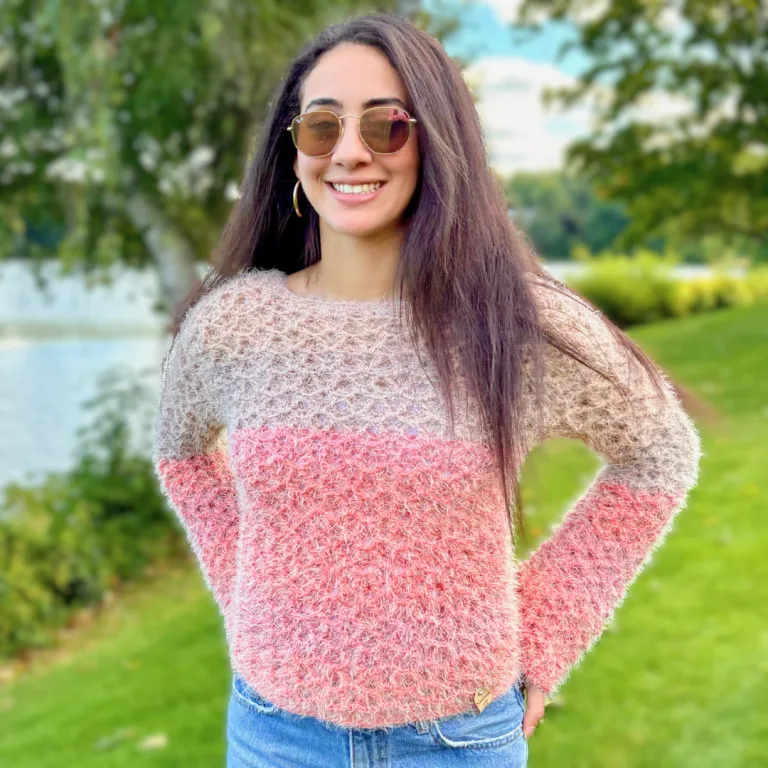
I’m so excited to share the Lilah Sweater with you today! This free crochet sweater pattern creates a soft and fluffy pullover that’s such a joy to make and feels amazing to wear — I think you’re going to love it as much as I do. 💕
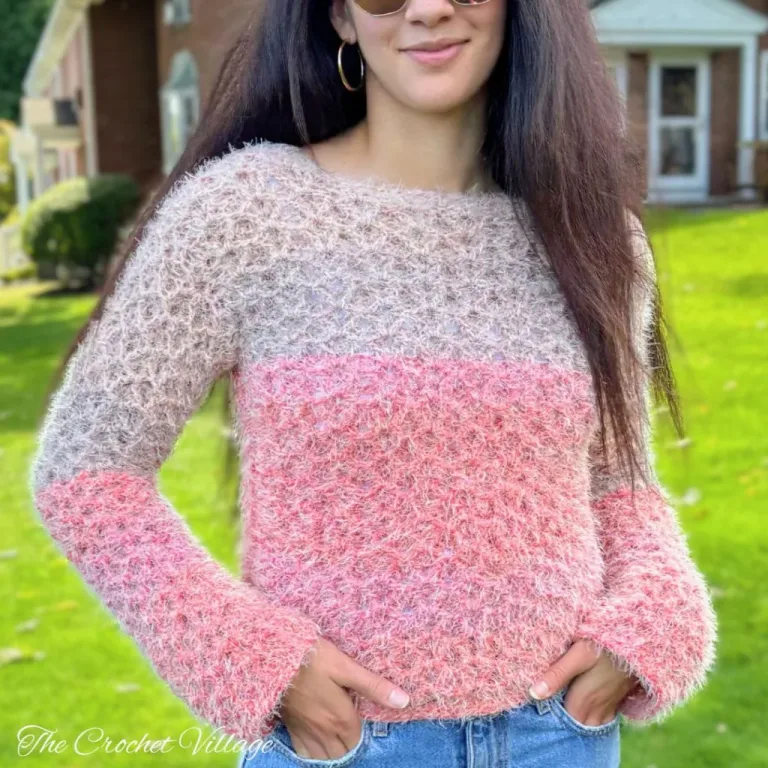
The Lilah Sweater has everything you’d want in a handmade pullover — it’s cloud-soft, super lightweight, has that gorgeous fuzzy mohair texture, and fits beautifully across all sizes. The stitch pattern is easy, the construction is simple, and it’s perfect for intermediate crocheters.
For this free crochet sweater pattern, I used the waffle V-stitch — one of my absolute favorites! I also used it in my popular Chestnut Blanket (you can check it out here), and it gives the sweater such a lovely texture. Plus, it’s just a one-row repeat, so once you get into the rhythm, it works up quickly.
I used Caron Latte Cakes yarn for my version. It’s labeled as a #5 bulky yarn, but it feels more like a #4 worsted weight, so you can easily use medium-weight yarn too, just make sure to swatch first.
This free fluffy crochet sweater pattern includes instructions for sizes XS through 5XL. The sweater is worked in two simple panels from the bottom up, with sleeves crocheted directly onto the body — no visible seam! It’s designed to be slightly cropped, but you can easily adjust the length.
Keep reading to find the free pattern, or if you prefer a printable add-free PDF, you can find it on Etsy, Ravelry, and my online store!
Related: Crochet Sweater Collection

Before You Explore this Free Fluffy Crochet Sweater Pattern
Free Crochet Fluffy Pullover Pattern: Start Here
Pattern Notes
- This pattern is written in US terms.
- Skill level is intermediate.
- This sweater is crocheted from the bottom up in separate panels and sewn together at the end.
Recommended Yarn: 🧶Caron Latte Cakes Self-Striping Yarn, #5 Bulky weight yarn. Color shown: Red Macaron
Note:
- The yarn is labeled as a #5 bulky, but it’s quite thin and works up like a worsted weight.
- I separated the colors (orange and beige) instead of using the yarn as it came.
- For the panels: crocheted the first 25 rows in orange, then switched to beige.
- For the sleeves: started with beige for the first 18 rows, then switched to orange.
- Used orange for the sleeve and bottom edging.
- Used beige for the neckline and sleeve cuffs.
Yarn Substitution
These yarns are a close match, but you should always swatch.
- Lion Brand LiteYarn
- Caron Colorama Halo Cake Yarn
- Lion Brand Ferris Wheel Yarn
- Red Heart Unforgettable Yarn
Yardage: Depends on the size you are making, see sizing chart below
Crochet Hook: 6.5 mm or the needed hook to meet the gauge.
Other Materials
- Tag: Faux leather tags
- Stitch markers.
- Measuring tape.
- Tapestry needle.
- Scissors.
Gauge: 5”x 4”= 21 ST and 7 Rows (see how to check your gauge below)
Abbreviations
- CH: Chain
- ST: Stitch
- SL ST: Slip stitch
- SC: Single crochet
- DC: Double crochet
- BLO: Back loop only
- FPDC: Front post double crochet
- SP: Space
- YO: Yarn over
- RS: Right side
- WS: Wrong side
- Rep: Repeat
Special Stitches
Front post double crochet (FPDC): YO, insert hook from front to back and then from back to front around the post of the stitch from the previous row (instead of into the top loops), pull up a loop, YO, pull through 2 loops, YO, pull through 2 loops.
Step 1- Check your gauge
- Meeting the gauge is essential when working on a garment. If your gauge is off, the final sweater may end up too small or too large.
- If you’re new to gauge swatching, click here for more details.
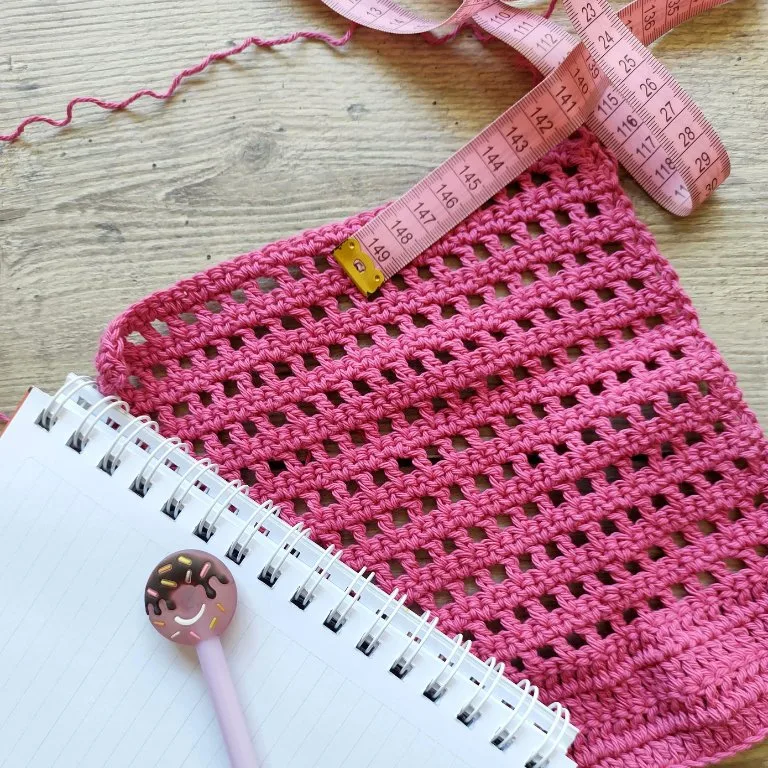
- The instructions below will create a gauge swatch that is 5” wide by 4 ”high.
Make a swatch
Row 1: CH 21 to make a foundation chain, DC in the 6th CH from the hook (counts as a DC+CH 2),*(DC, CH 2, DC) in next CH, DC in next CH, skip next 2 CH, DC in next CH*, rep *to* across, turn.
Row 2: CH 2, skip the 1st DC (holding the CH 2), skip next DC, FPDC in next DC, (DC, CH 2, DC) in next CH-2 sp, FPDC in next DC, *skip next 2 ST, FPDC in next DC, (DC, CH 2, DC) in next CH-2 sp, FPDC in next DC*, rep across ending with skip next DC, DC in the starting CH-6 sp, turn.
Row 3: CH 2, skip the 1st DC (holding the CH 2), skip next DC, FPDC in next DC, (DC, CH 2, DC) in next CH-2 sp, FPDC in next DC,*skip next 2 ST, FPDC in next DC, (DC, CH 2, DC) in next CH-2 sp, FPDC in next DC*, rep across ending with skip next DC, DC in the starting CH-2 sp, turn.
Row 4 – 7: Rep Row 3.
- If you can’t match the gauge with the suggested hook, try changing your tension or using a larger or smaller hook.
- If your width is correct but the height isn’t, stick with the hook that gives you the right width.
Step 2 – Find your size
- Measurements are taken with the garment laid flat before wear.
- The model is 5’8″ with a 34″ bust and is wearing a size small.
- The sweater is designed as a crop top, but feel free to adjust the length and fit to your preference.
- For the best fit, use your bust measurement and select the closest size from the table below. Please note that the stitch naturally stretches and is designed for a snug fit. If you prefer a looser fit, consider sizing up.
- The stitch count and number of rows for each size can be found in parentheses in the corresponding color (color codes are available in the premium version only): XS (S, M, L, XL, 2XL, 3XL, 4XL, 5XL)
- The numbers at the beginning of the rows are your row count for all sizes.
- The numbers at the end of the rows are your stitch counts for all sizes.
Click here for the sizing chart
| Size | Bust Size | Panel Width | Length | Sleeve Length | Yardage |
| XS | 28”- 30” | 15” | 19” | 17” | 2 skeins/ 992 yds |
| S | 32”- 34” | 17” | 19” | 19” | 2 skeins/ 1060 yds |
| M | 36”- 38” | 18” | 21” | 19” | 2 ½ skeins/ 1159 yds |
| L | 40”- 42” | 20” | 22” | 19” | 3 skeins/ 1340 yds |
| XL | 44”- 46” | 22” | 23” | 20” | 3 skeins/ 1560 yds |
| 2XL | 48”- 50” | 24” | 24” | 20” | 3 skeins/ 1600 yds |
| 3XL | 52”- 54” | 26” | 24” | 22” | 4 skeins/ 1796 yds |
| 4XL | 56”- 58” | 28” | 26” | 22” | 4 skeins/ 1900 yds |
| 5XL | 60”- 62” | 30” | 26” | 22” | 4 skeins/ 2000 yds |
The amount of yarn needed may vary if you’re using a different yarn or if you adjust the length or width of the pattern.
If you want to customize this pattern to your special measurements or you are using a different weight yarn, follow the steps below:
- Make a foundation chain to fit around your chest.
- Divide the chest measurement by 2 to get the panel’s width.
- For a standard fit, add 2”- 4” ease (or to the desired width) to the width of the panels.
- Adjust your foundation chain to be a multiple of 5+1 by adding or removing stitches as needed.
- You can make your top longer or shorter by adding or removing rows on both panels (before the neckline split).
Lilah Fluffy Sweater Crochet Pattern
This free crochet sweater pattern has everything you need to make your own Lilah Sweater! In this post, you’ll find the full list of materials, stitch guide, and step-by-step instructions to create this beautiful, soft, and fluffy handmade pullover.
If you’d prefer a printable, ad-free PDF version of this fluffy crochet sweater pattern, you can grab the premium copy for a small fee in any of my shops—links are below. The premium version is color-coded for sizes and includes a step-by-step full photo tutorial!
Prefer A Printable PDF?
Treat yourself to the ad-free, beautifully formatted version of this design for a small fee!
Step 3 – Crochet the panels (make 2)
CH 56 (61, 66, 71, 76, 81, 86, 91,96) to make a foundation chain.
Row 1: (RS) DC in the 6th CH from the hook (counts as a DC+CH 2),*(DC, CH 2, DC) in next CH, DC in next CH, skip next 2 CH, DC in next CH*, rep *to* across, turn. 10 (11, 12, 13, 14, 15, 16, 17, 18) (DC, CH 2, DC) groups.
Row 2: (WS) CH 2, skip the 1st DC (holding the CH 2), skip next DC, FPDC in next DC, (DC, CH 2, DC) in next CH-2 sp, FPDC in next DC, *skip next 2 ST, FPDC in next DC, (DC, CH 2, DC) in next CH-2 sp, FPDC in next DC*, rep across ending with skip next DC, DC in the starting CH-6 sp, turn.
Row 3: (RS) CH 2, skip the 1st DC (holding the CH 2), skip next DC, FPDC in next DC, (DC, CH 2, DC) in next CH-2 sp, FPDC in next DC,*skip next 2 ST, FPDC in next DC, (DC, CH 2, DC) in next CH-2 sp, FPDC in next DC*, rep across ending with skip next DC, DC in the starting CH-2 sp, turn.
Note: The stitch stretches, so if your gauge is correct, but the width of your panel is smaller than the pattern’s, stretch it a little to see if it matches the pattern. If still small, you are probably crocheting too tightly. Adjust your tension and recheck the width of your panel after a few rows. Consider changing the hook size, choosing another size, or adding/removing a multiple of 5 stitches from the foundation chain to achieve the desired width.
Row 4 – to Row 36 (36, 40, 42, 44, 46, 46, 48, 48) or to the desired length: Rep Row 3. Do not cut yarn; proceed to shape the neckline.
Note: Customize the length of the panel if needed before proceeding to the next step. Remember, you still need to crochet about 2 ½” for the shoulder.
Step 4 – Shaping the neckline (same for both panels)
In this step, you will divide the last row of the panel into three sections: one for the head opening in the middle, and two for the shoulders on the sides.
- From the outside working towards the center, count 2 (3, 3, 4, 4, 5, 5, 6, 6) clusters and place a stitch marker in the 1st FPDC of the next Cluster.
- For sizes S, L, 2XL, and 4XL, you should have 5 clusters in the middle.
- For sizes XS, M, XL, 3XL, and 5XL, you should have 6 clusters for the head opening.
- Repeat this on the other side. Crochet the shoulders next.
Shoulder 1
Row 37 (37, 41, 43, 45, 47, 47, 49, 49): (RS) With the yarn still on the hook, CH 2, skip the 1st DC (holding the CH 2), skip next DC, FPDC in next DC, (DC, CH 2, DC) in next CH-2 sp, FPDC in next DC,*skip next 2 ST, FPDC in next DC, (DC, CH 2, DC) in next CH-2 sp, FPDC in next DC*, rep *to* across ending with skip next DC, DC in marked ST, turn.
Row 38 (38, 42, 44, 46, 48, 48, 50, 50): (WS) CH 2, skip the 1st DC (holding the CH 2), skip next DC, FPDC in next DC, (DC, CH 2, DC) in next CH-2 sp, FPDC in next DC,*skip next 2 ST, FPDC in next DC, (DC, CH 2, DC) in next CH-2 sp, FPDC in next DC*, rep *to* across ending with skip next DC, DC in the starting CH-2 sp, turn.
Repeat the last row 2 more times. At the end of the last row, fasten off, cut yarn, and leave about 12” long tail for sewing (you only need to leave a long tail for sewing on one panel).
Shoulder 2
Row 37 (37, 41, 43, 45, 47, 47, 49, 49): (RS) Slip knot then DC in the marked ST, skip next DC, FPDC in next DC, (DC, CH 2, DC) in next CH-2 sp, FPDC in next DC,*skip next 2 ST, FPDC in next DC, (DC, CH 2, DC) in next CH-2 sp, FPDC in next DC*, rep *to* across ending with skip next DC, DC in the starting CH-2 sp, turn.
Row 38 (38, 42, 44, 46, 48, 48, 50, 50): (WS) CH 2, skip the 1st DC (holding the CH 2), skip next DC, FPDC in next DC, (DC, CH 2, DC) in next CH-2 sp, FPDC in next DC,*skip next 2 ST, FPDC in next DC, (DC, CH 2, DC) in next CH-2 sp, FPDC in next DC*, rep *to*across ending with skip next DC, DC in the starting CH-2 sp, turn.
Repeat the last row twice more. At the end of the last row, fasten off, cut yarn. Proceed to join the panels.
Step 5 – Join the shoulders (same for all sizes)
- Weave in all ends.
- Align the panels, the wrong sides facing out.
- Use pins to attach the front panel’s shoulder sections to the back panel.
- Use the tapestry needle and the long tails to sew the shoulders (only), making sure you grab one stitch from the one panel and the opposite stitch from the opposite panel. Feel free to join the shoulders with SL ST.
- Fasten off. Weave in ends.
Step 6 – Prepare to crochet the sleeves
- The sleeves are crocheted in rows from the top of the arm to the cuff and are attached directly to the body.
- Lay flat the body of your sweater and mark the shoulder seam with a stitch marker.
- Place two additional stitch markers 17 (17, 17, 19, 19, 19, 21, 21, 21) rows below the first one, one on the front panel and the other on the back, referring to the picture below for guidance.
- Remove the first stitch marker (seam). The distance between these markers is the width of the sleeve.
- Repeat the same steps on the opposite edge for the 2nd sleeve.
Step 7 – Crochet the sleeves (make 2)
Row 1: Crochet loosely the 1st 2 rows. (RS) With the right side facing you, slip knot, DC in the 1ST marked row,*(DC, CH 2, DC) in next row, DC in next row, skip next row, DC in next row*, rep *to* across ending with (DC, CH 2, DC) in next row, DC in the 2nd marked row, turn. 9 (9, 9, 10, 10, 10, 11, 11, 11) (DC, CH 2, DC groups)
Row 2: (WS) CH 2, skip the 1st DC, FPDC in next DC, (DC, CH 2, DC) in next CH-2 sp, FPDC in next DC, *skip next 2 ST, FPDC in next DC, (DC, CH 2, DC) in next CH-2 sp, FPDC in next DC*, rep across ending with skip next DC, DC in last ST, turn.
Row 3: CH 2, skip the 1st DC (holding the CH 2), FPDC in next DC, (DC, CH 2, DC) in next CH-2 sp, FPDC in next DC,*skip next 2 ST, FPDC in next DC, (DC, CH 2, DC) in next CH-2 sp, FPDC in next DC*, rep across ending with skip next DC, DC in the starting CH-2 sp, turn.
Row 4 – 37(39, 39, 39, 41, 41, 43, 43, 43) or to the desired length: Rep Row 3. at the end of last row fasten off, cut yarn and leave a long tail for sewing.
Step 8 – Sew the sleeves and panels
- With the wrong side facing out, fold the sleeve lengthwise.
- Ensure the panels are aligned and use pins to attach them if needed.
- Sew the long ends of the sleeve one stitch at a time, using a tapestry needle and the long tail.
- Once you reach the end of the sleeve, sew the sides of the panels together, referring to the picture below.
- Feel free to use slip stitches to join the sleeve and panels. Fasten off.
Step 9 – Finish the sweater
Crochet the neckline edging
Rnd 1: With the right side facing you, slip knot, SC in the shoulder seam on your right, [2 SC in each of next 4 rows,*SC in next CH-2 sp, SC in next 4 ST*, rep *to* across ending with SC in next CH-2 sp, 2 SC in next 4 rows], SC in the seam to your left, rep [to] around, join with a SL ST into the 1st ST, CH 1.
For sizes S, L, 2XL, and 4XL:
Rnd 2: SC BLO in each ST around, join with a SL ST, Fasten off, cut your yarn.
For sizes XS, M, XL, 3XL, and 5XL:
Rnd 2: *SC BLO in next 6 ST, skip next SC*, rep *to*, join with a SL ST into the 1st ST, CH 1.
Rnd 3: SC BLO in each ST around, join with a SL ST, Fasten off, cut your yarn.
Crochet the sleeve edging (same for both sleeves)
Rnd 1: With the right side facing you, slip knot, SC in the seam, SC in each ST around, place 1 SC in the CH2- sp, join with a SL ST into the 1st ST, CH1 (feel free to crochet continuously next round).
Rnd 2: SC BLO in each ST around, join with a SL ST into the 1st ST, fasten off.
Crochet the bottom ribbing
Crochet the bottom edging the same way you did with the sleeve’s edging.
Cut and weave in all ends, attach a tag, and you are all done!
I offer full support to help you with any questions or challenges you might have. Feel free to drop your comments in the section below or join our Facebook group, where I, along with my wonderful testers and community members, will be more than happy to assist you!